
I’ve been playing around with drawing on fabric for a while, but haven’t been able to pull it together into a project until now.
Pretty excited about how this turned out and about the potential here. The rough texture of the canvas really makes this piece work.

Here’s how it’s done (measurements are for an 11 x 14 canvas):
– Cut and iron a piece of canvas fabric (cotton duck) at least 13 x 16 inches.
– Cut a slightly larger piece of freezer paper and iron it wax side to wrong side of canvas.

-Trim neatly to 13 x 16 inches (rotary cutter preferred). The leading edge should be especially clean and straight, other edges not as critical.

– Load fabric pen into pen holder. I am using the Marvy Ball and Brush pen with the ball end. I used the new style Silhouette pen holder because this particular pen fits at the proper depth. I also used them to . You can also use the Chomas marker holder.

– Set rollers at 12 inches apart. This is the slot second from the right.
– Load 13 inch edge of prepared fabric into Cameo centered on rollers (1/2 inch fabric extending outboard of each roller)
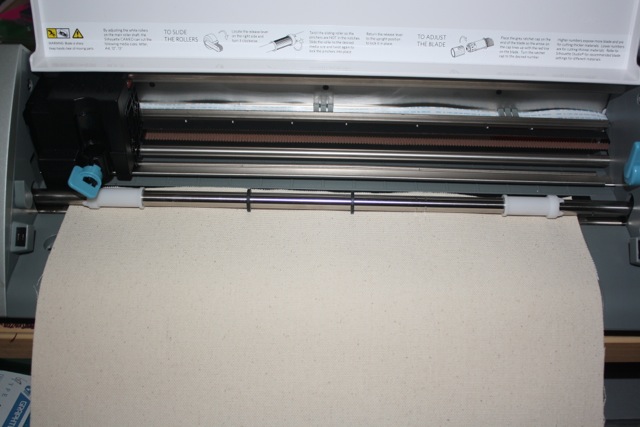
– Load pen holder into Cameo.
– Open sketch file in Silhouette Studio.
– From the Cut Setting Panel choose settings for Sketch Pen.

– Press Cut.
(You can see in the photo below that I used 12 inch wide fabric in my sample. It worked but was too nerve-racking so that’s why I specify 13 inch wide.)

The most complicated part of this project is finding a suitable sketch file. At small sizes you can get away with a standard trace of a line art, but at 11 x 14 a true sketch file with open path strokes is going to be needed.
Here’s a comparison of what a normal trace versus a proper sketch file looks like in Silhouette Studio to show you what I mean. Click to enlarge.

Here’s how I went about creating the file (not for the faint-hearted … Adobe Illustrator, intermediate graphic design skills and lot of patience required):
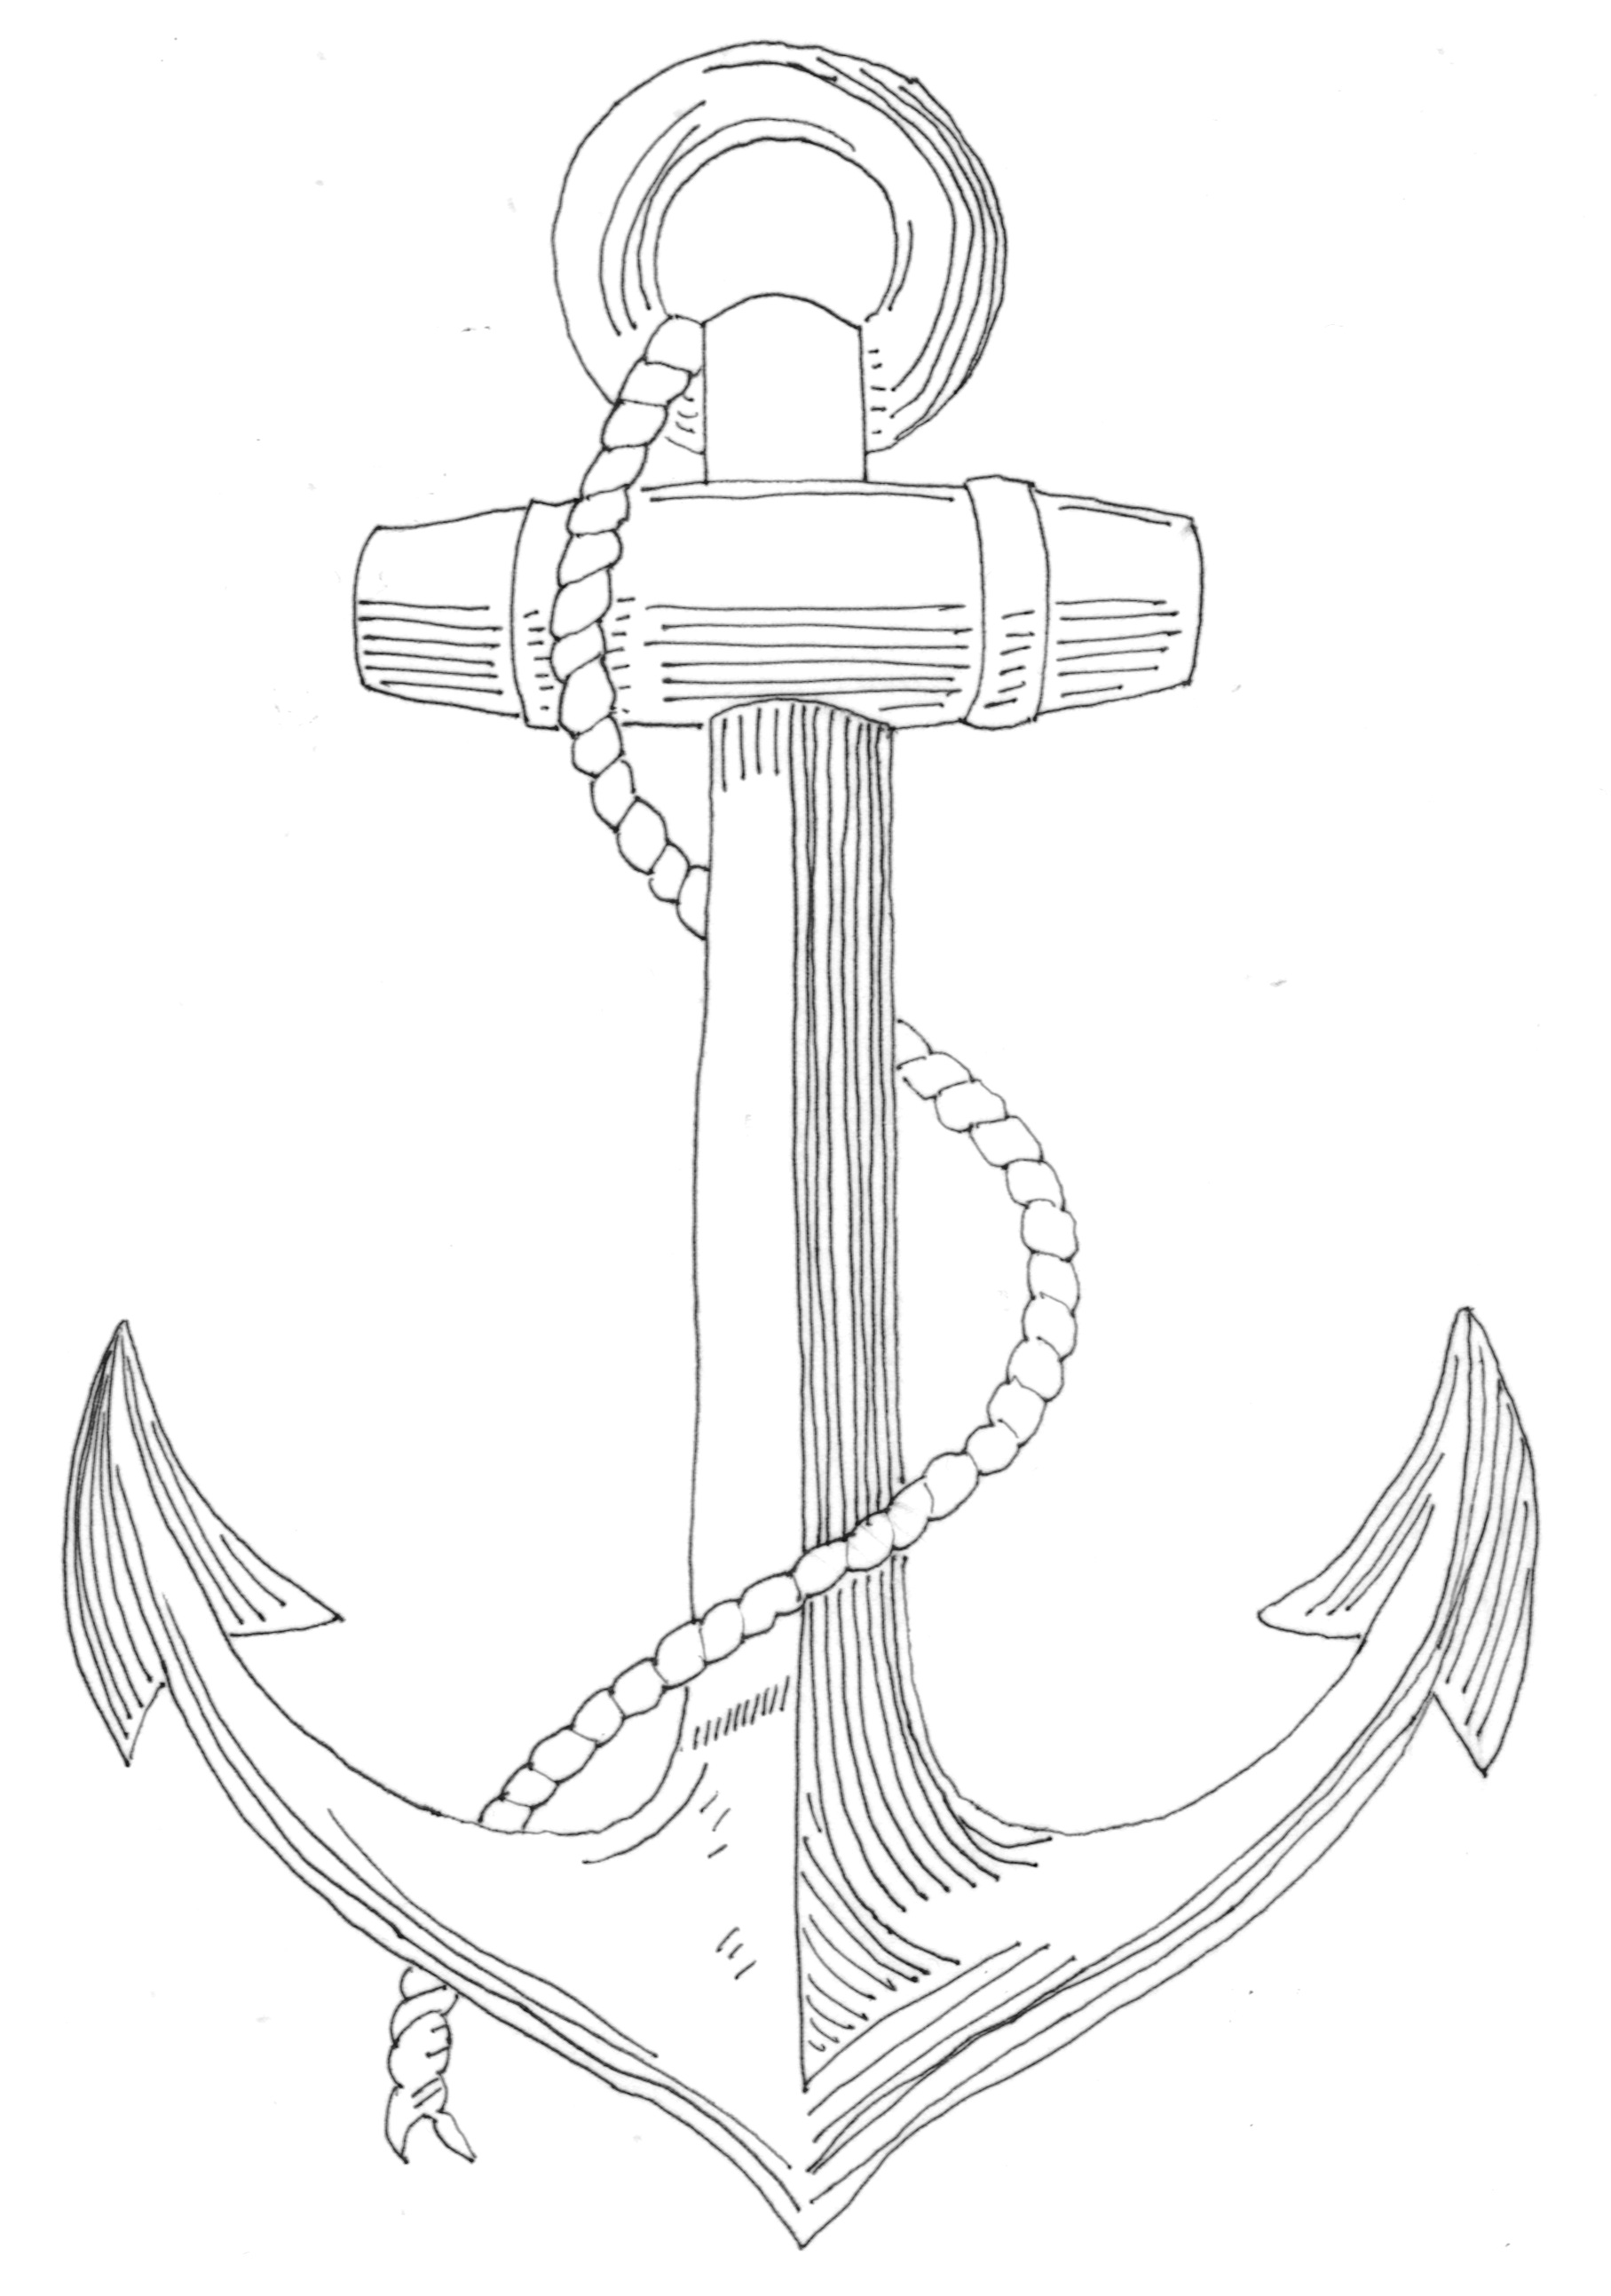
– I selected a vintage image of an anchor. I have zero artistic ability so I needed something with just enough detail that I could handle.

– I printed it out at full page size.

– I taped a piece of tracing paper on top and hand traced it with an ultra fine pen. The idea here is to recreate the drawing with pen strokes that do not touch each other.


– I scanned my hand trace into Adobe Illustrator.
– In AI, I performed a center line trace (unlike the normal trace that finds both edges of a line, this attempts to find the center of the line and returns it as an open path.)
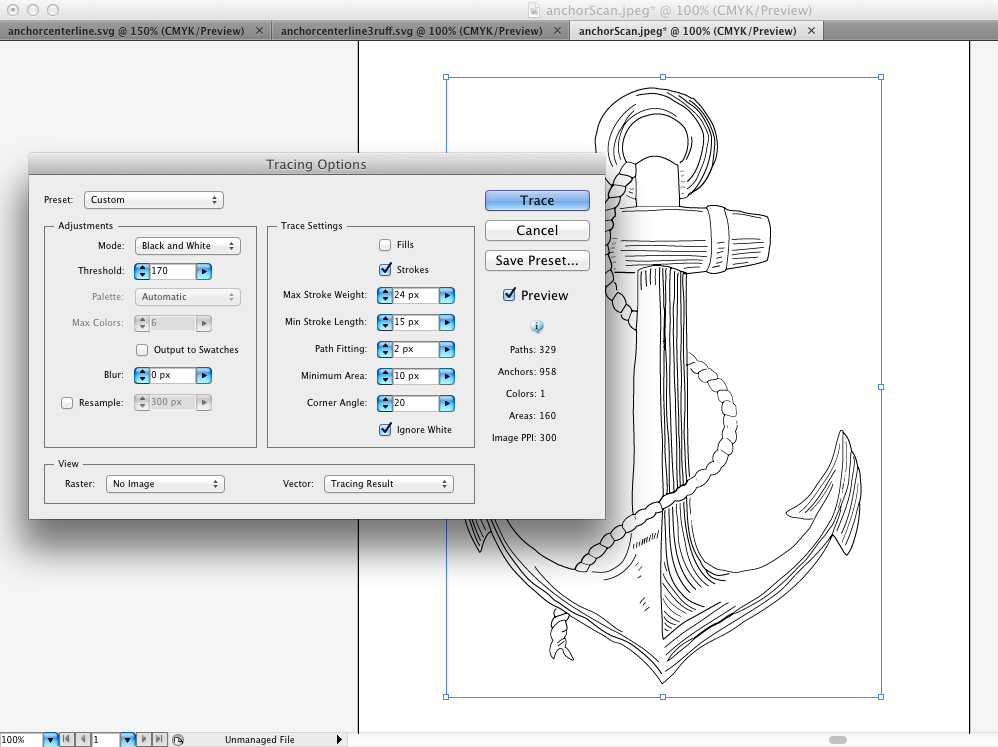

– I then point edited to clean up messy areas like this where the strokes overlap and can’t be traced as intended. This was the most tedious part.

– Saved as SVG. (You can export to DXF if you don’t have DE.)
– Merged the SVG into a blank 12 x 16, no mat page in Silhouette Studio Designer Edition.
– Applied sketch effects to the anchor SVG to give it a little more natural look. This step was optional, and the effect was subtle, but I recommend it if you have DE.

– Added text (I used Always Here font and added 1 internal offset at 0.010 as fill)

– Arranged layout and centered in 11 x 14 rectangle. (In my original I did not draw the rectangle, but in the future I will as it would help for final trimming of the canvas to fit the frame).

I found creating the sketch file to be a long and tedious process and I don’t recommend it unless you are very determined. No worries, though, because I’m sharing my file with you. Personal use only, and please share the link to this post, not the file itself, and whatever you do don’t try to cut this file with a blade, it’s for sketching only. Click here for the .studio file and here for the SVG. Thank you.
Now in case you are wondering why the sudden inspiration to complete a project, I am participating in a challenge. If you’d like to see more great fabric-related (our theme this month) projects, take a look below.

- No-Sew Valentine’s Day Pillows by A Tossed Salad Life
- No-Sew Interchangeable Fabric Bunting by unOriginal Mom
- Monogrammed Burlap Garden Flag by The Turquoise Home
- Crawl, Walk, Bike by It’s Always Craft Time
- Freezer Paper Stenciled Tote Bags by Weekend Craft
- DIY Bleach Spray Shirt by Practically Functional
- Stenciling Sherlock by Please Excuse My Craftermath…
- Felt Star Wands by Cutesy Crafts
- Yoda Kid’s T-Shirt by Architecture of a Mom
- Mark Your Territory- Dog Flags by Black and White Obsession
- Nautical Pillows by Lil’ Mrs. Tori
- Big Sister Gift & Silhouette Cut File by Creative Ramblings
- Nerdy Baby Onesies + Free Cut File by Essentially Eclectic
- Easy Easter Bunny Onesie – Silhouette Cameo Craft by Adventures in All Things Food & Family
- Fabric Envelopes for LEARNING LETTERS! (& cut file) by From Wine to Whine
- “Good Morning, Sunshine!” Memo Board by Tried & True
- Hearts-A-Lot Burlap Pillow Cover by My Paper Craze
- Baby Quilt by Dragonfly & Lily Pads
- Surprise Holiday Banner by Whats Next Ma
- “Team Betty” Tote Bag by The Thinking Closet
- DIY Sock Minion by Create it. Go!
- Pretty Up Some Organza Bags by Getsilvered
- Easy Heart Appliqued Onsies by Create & Babble
- Bleach Pen Gel & Freezer Paper Stencils Made with the Silhouette Machine by Bringing Creativity 2 Life
- Valentines Baby Onesie & Boy’s Shirt + Free Cut Files by The Frill of Life
- Valentine’s OWL Always Love You T-shirt by My Favorite Finds
- DIY Screen Printed Curtains by Chicken Scratch NY
- Fabric Painted Quilted Wall Hanging by Terri Johnson Creates
- Glitter Iron-On Top by Simply Kelly Designs
- DIY Monogrammed T-shirts with Silhouette Heat Transfer Material by Pitter and Glink
- Birthday Challenge by Fadville
- Machine Applique with SIlhouette Cameo by The Sensory Emporium
- Fabric Applique Valentine’s Day T-Shirt by DailyDwelling
- “Cute as Cupid” shirt by crafts, cakes, and cats
- Sew Cute Applique by Life After Laundry
- Rhino Onesie by It Happens in a Blink
- Upcycled Birchbox Cameo Accesory Organizer by Cupcakes&Crowbars
- Customizing textiles with Heat Transfer Vinyl (working title) by feto soap
- Easy Fabric Art by McCall Manor
- Lady Bug Tote Bag with Silhouette Rhinestones by Ginger Snap Crafts
- Mommy and Em’s Coordinated Aprons by TitiCrafty
- Canvas sketch project and a share by Clever Someday
- Foxy Lady Pajamas by Mabey She Made It
- Teddy Bear by Work in Progress

[…] Canvas sketch project and a share by Clever Someday […]