**now updated to simplify process using new features in Silhouette Studio Designer Edition 4.2.471 or later. (update is free to prior purchasers)
Click here for a free downloadable excerpt, or to purchase.
Original post:
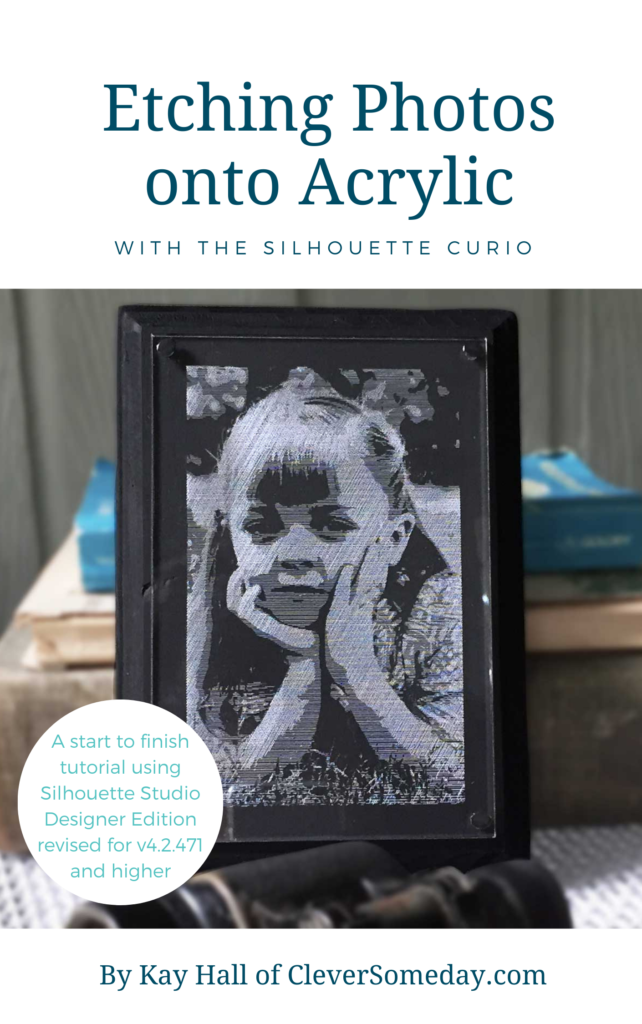
Some of you know I’ve been working for months on various photo etching techniques for the Silhouette Curio. I’d gotten great results like the ones you see below, but it took some time to refine and simplify the process so it could be accomplished in Silhouette Studio Designer Edition alone, and distilled for teaching to others.
In April, I had the opportunity to teach the technique at Sew Grammie’s Curio retreat in Charleston, SC. It was so well received, I wanted to make it more widely available. But the material just didn’t lend itself to a blog post or video, and several people recommended I do an ebook. So I set to work on it and have created a heavily illustrated, 48 page detailed tutorial covering not just how, but why it works, as well as related resources and bonus files. Today I am proud to announce the release of my first ebook, Etching Photos onto Acrylic with the Curio for $3.99.
Tip: If you click the “Preview” banner in the upper right of the product images on the sales page, you can download a PDF with 7 sample pages to get an idea of the quality of graphics, level of detail, etc.

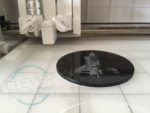
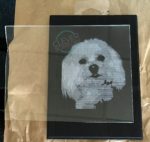
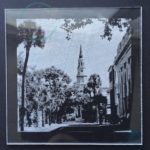
A few other examples of etchings I created with this technique:

Please be sure to let me see the etchings your create with this new technique!
Prefer video classes? I teach this technique on Craftcast.

Can this be done on a Cricut explore air 2 machine?
Not yet, but I’m actively working on it. In the meantime, check to be sure you don’t have the Explore Air 2 scoring bug, because that will prevent you from getting these kinds of results. Unfortunately, unless you have another model to compare to, its hard to tell if you have the bug, but if you feel like your score lines are very faint, I would urge you to call Cricut.
Very cool! Congrats on your first book; Curio owners are so lucky to benefit from expertise. Might have to get one.
Omg! I would buy this machine just to do that alone!! Any chance i can do this with my cricut explorer?
I am actively working on how to do this with Cricut. Stay tuned.
C An you use the cameo 3 with this?
Yes, if you can find acrylic blanks thin enough, or use perhaps etching metal instead.
Wow! I had no idea this could be done. I’ve had my Curio for more than 2 years and haven’t tried to use it yet. It intimidates me. I’m buying your book and can’t wait to try your technique.
Fabulous! Thanks for doing this e-book. I can’t wait to dig in and give it a try.
Really appreciate that Mags! Can’t wait to see how this technique, combined with your artistry, turns out!
Good Morning, Kay! I have a Cameo with DE, but have not updated my software to the versions with the Cloud, mine works fine for me. I wanted to get the Curio for etching, but was wondering if I could still use my version, or would I have to get the latest release? TIA
Yes, the Curio will work with version 3.6, the last one before the cloud.
Congratulations Kay! This etching technique is way out of my league but I am so happy for your accomplishment. And one that will help many others, I’m sure. Thanks for all the help you share.
This looks amazing, Kay! I’ve got my copy and have skimmed through it. Wonderful instruction and detail, as always. I loved making my small acrylic etching projects last Christmas, so I can’t wait to try this out with photos!
I just purchased the ebook. Thank you for a great price.
Bought it. I hope you write one on Stippling on acrylic. I have notes from Carl’s instructions but would prefer an ebook.
Guess we’ll just have to talk to Carl about that 🙂
Fabulous! This is a bargain and the execution is exceptional. Follow along and you will be amazed with the results!
I have a Cameo. Will your technique work with it as well?
The design portion is applicable to Silhouette Studio Designer Edition in general (converting the photo to an etching file), but the rest is Curio-specific. The issue with the Cameo is going to be finding blanks that will fit under the rollers, as well as securing the blank, which is much easier on the Curio because of its rigid platform.
Had my Curio for over a year and not accomplished anything with it. Don’t know why I am so intimidated. Have downloaded your book and hope to produce something worth sharing! Thank you for writing this tutorial.
Can you use this technique to etch on copper sheet?
I honestly don’t know because I haven’t etched copper before. The steps in the ebook are written for light marks on a dark background, which I’m not sure would be the case if etching bare metal. Its actually less complicated to do dark on light, but you’d have to adapt the steps, which I’m happy to help with if you want to try it.
Thank you Kay Hall you are awesome!
Excellent resource Kay. I will enjoy working with this.
I can use only the silhouette studio or I need Silhouette Studio Designer Edition
Thanks
Designer Edition or above is required for the Layers feature.
https://www.facebook.com/photo.php?fbid=2273405092696656&set=gm.2451424801770187&type=3&theater&ifg=1
Hello, Kay!!! The Maker now has an engraving tool, as I’m sure you’ve already heard. I hope you do a tutorial or e-book for the Maker, as well. I’ve retired my Silhouette. I now have an iPad and can get all the awesome iPad apps to use with my Maker (the DS app is AH-mazing!!). Anyhow, I was just curious… would the new debossing tip for the Maker work for flat embossing per the flat embossing technique you posted for Cricut machines a while back? Everyone is saying that this tip will only deboss, but I bet it might could EMboss, if there was a stencil under it… I’m not sure tho… just curious! 🙂
Yes, well aware and already engraving away. There may or may not be an ebook in the works. As far as the debossing tip and my stencil emboss technique, the scoring stylus is going to work better because the debossing tool doesn’t have much clearance between the tip of the ball and the body of the tool. I might still try it if I get a chance.
Realize I never came back to let you know that a Maker version of the ebook is now available. It requires Silhouette Studio Business Edition in order to save the SVGs for import to Design Space.
Will this work on my Silhouette portrait with designer software? Do I need a special blade? I have only used it to cut card and vinyl.
I have done this successfully with the Cameo 3 and Silhouette Etching/Stippling Tool but don’t have a Portrait to test. It would depend on which Portrait you have as to whether this would work or not (amount of clearance and type of tool holder).
good morning, will this technique work with Brother Scanncut please? I have the Chomas engraving tool to use with it. Love the look but dont want to buy yet another machine
thank you for all you video’s / hints/ tips and information that you have shared over the years
Best wishes
Hi Lindsay. I have not tested this process on ScanNCut and can not guarantee it but I have heard that it is possible. I would recommend the Maker version of the ebook, since it is geared towards creating an SVG to use elsewhere. Silhouette Studio Business Edition is required. https://payhip.com/b/Adua
This is not a comment about your project, however I have a question. Since you use Inkscape, I would like to know why words, and/or phrases, set-up in Inkscape upload into Cricut design space individually instead of the phrase? I have tried to figure this out but have come up blank!
I would appreciate some direction if possible.
Design Space separates things that other programs keep together, so you have to take a few extra steps to have things come into DS on one layer. In Inkscape, this means selecting the items you want, making sure they are not grouped or clipped and then selecting Combine from the Path menu.
You need to convert to path in the “chunks” you want together. So, type your text, then path>object to path, object>ungroup then path>Combine either all together or by phrase, etc.