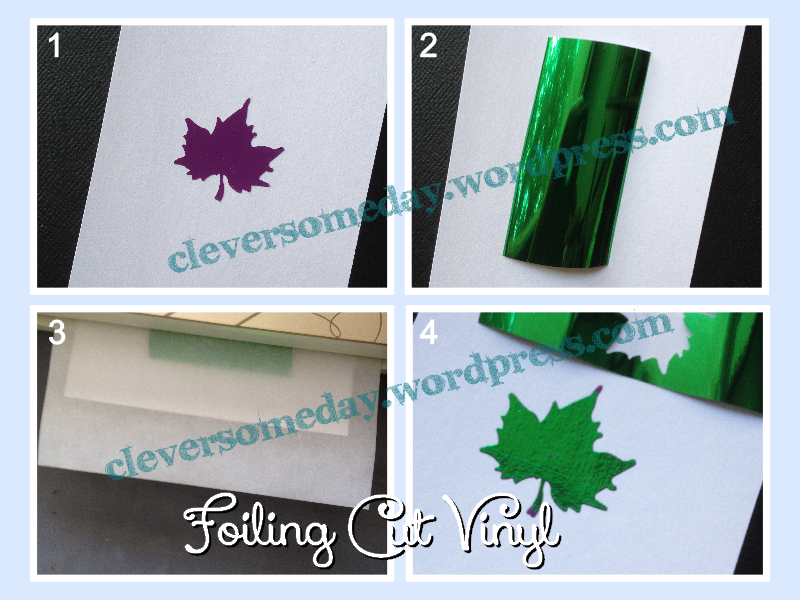
 I wrote my first article on laser foil back in 1993 and I couldn’t be happier to see the shiny stuff making such a strong comeback. Since a lot of you don’t have laser printers, but you do have diecutters, I want to let you know of yet another method you can use for foiling. Foil sticks to the plastic in adhesive vinyl (gloss finish works best), just like it does to toner, so have at it!
IMPORTANT: Please use caution when using parchment or copy paper instead of the folders. If the combined stack is not large enough or stiff enough it can wrap around the rollers and possibly damage your machine.
(Visited 4,556 times, 1 visits today)

When running through the minc on the actually backing and then transferring. Will this work on coffee mugs and glass? Oh the possibilities of it does.
It should work fine on glass. I have no idea if it would be washable, but that’s certainly worth a try!
i have now tried this technique and it is fab!!! I have an old letseret foiling machine and cheap vinyl from ebay and it worked brilliantly, thank you so much for letting us know about this and it will give a hardly used machine a new lease of life.
OMG Terrific video and info BIG THANK YOU
I really love your posts, they’ve been really helpful over time. When I saw this one yesterday it made me think about all the foil that I have had sitting here for years. So I tested it the way you described below with good results. Then I wondered, “what if I were to adhere the foil to the vinyl, then run it through the cutter?” It worked great. Weeded great. Just wanted to share that in case you hadn’t thought to try it. Thanks for your posts. Kathy
I used a mother of pearl foil and then put it on a gold Altoid-like box (not smart for taking a photo).
That was next on my list to test, as I thought it might solve some of the edge issues. Thanks so much for letting me know your results! I have also tried foiling after cutting and before weedig and that works too.
So excited to follow your post!
Just tried foiling the laser printed wedding invitation from my niece’s wedding. We used the Amazon basics laminator set at 3MM. We scanned it and printed it on cardstock, then we sandwiched it between notepaper and made two passes. Almost perfect with a slight wrinkle in one spot. Joannes had the Minc foil on sale.
The gold foiled wedding invitation is now matted and framed and we will give to our niece and her husband. It looks great, thank you Kay for the creative jump start.
Genius! I cannot believe that can be done. Thank you.
What kind of transfer tape did you use in this video?
I used blue painters tape in this example, but any low tack transfer tape will work.
Hi Kay, Love Your Video…
Did you notice a difference between colors of vinyl? I only have a laminating machine, but when I tried it I had OK results with a med purple (similar to your results with foiling the vinyl on it’s backing paper) but when I tried a very shiny silver, very little of the foil adhered. It was an interesting distressed look, but not what I had hoped for.
-Why would I try to foil silver vinyl? I have a huge roll of it, so don’t mind using it to experiment. No idea what kind it is – it was some sort of factory leftover.
Thanks for all your great ideas and detailed instructions. You’ve encouraged me to try things way out of my comfort zone.
It works best on glossy vinyl because of the smooth surface. Metallic vinyls may be a different category altogether, though.
HI Kay: Thanks so much this is fantastic. I’m a new Minc owner and I’m new to making cards too. I don’t have a laser printer but I do have a cutter and I buy lots of vinyl so that is easy. Do you find that the vinyl produces as nice of quality as the laser printer?
The coverage of vinyl vs laser is comparable, but the big advantage to a laser printer is the tiny details you can foil, like text on an invitation, for instance. It is really apples and oranges as they are used for different things.
I just tried to do this using an old laminator and a newer Scotch one. I used 631 and 651. it really only stuck around the edges. Any suggestions?
Not sure if I mentioned this in the video, but I tried this with both of my laminators and had no luck. You really need the Minc or similar foiling-specific laminator for this.
Thanks, I got it to work on black matte once and then not again. I do like the effect I was left with for another project but for this one, I just went with a color instead. I’ll keep an eye out and see if I can get a minc for good deal.