Turns out the Knife Tool in Silhouette Studio Designer Edition isn’t as boring and useless as I originally thought. Take a gander at these 7 things you didn’t know it could do and watch the video to become a Knife Tool Ninja!
1) Constrain to horizontal, vertical and 45 degree angles. For the straight knife this is done with the Shift key, no big secret there. But for the pattern knives, let the knife “snap” to these positions (no settings for this, it’s just automatic).

Important Ninja Secret: For these next 6 tricks, you must uncheck the Auto Apply box after selecting the Knife Tool.

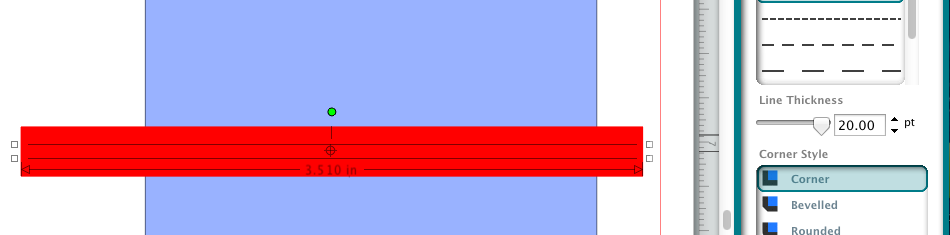
2) Change the width. Default line width for the knife tool leaves a problematic gap. Go to the Line Settings panel to reduce it to 0.05 for a negligible gap,

or set it high to cut a wide swath.
3) Adjust the pattern. The red dot adjusts amplitude (height or width) of the pattern knives. The slider adjusts the wavelength or distance between repeats.

You can also rotate or flip your knives so your scallops, for instance are facing the right direction.
4) Point edit the knife. The top 3 knives (straight, poly and curve) can be point edited just like any other shape them for precision placement before you apply the knife.

5) Copy and paste, duplicate or replicate a knife. I know!

6) Convert knife to path. Object>Convert to Path to turn a knife into a path. Get more mileage out of the pattern knife tools by using them to create plain old cut or draw lines. In fact, you don’t even have to convert the knife for it to function this way, so it can remain easily adjustable. How cool is that!

7) Save knives to your Library. Got a favorite size, shape, pattern or width? Save it with a document, or to your Library for easy access instead of recreating it each time.


Thank you so much for ALL the tips and videos you share…
so many of these things I did *not* know … have I mentioned lately that I love you?!?! {giggle}
Fantastic video! Thank you so much for your great tutorials.
OMG! This is FABULOUS! Can I claim to be YOUR #1 Fan??? Love your video’s, blog and all the helpful knowledge you share! You’re my new BESTIE! lol
Thanks so much for sharing the results of your explorations with cutting software. Keep experimenting! We love the results. 🙂
You are awesome!!!! Thanks for sharing all of your amazing tips!
Thanks for the great tips! I really need to practice with the knife tool.
Another brilliant tutorial! Thank you so much!
I don’t have time to play with all the features of the Silhouette DE but ALL your tips and tutorials are always just what I need to accomplish something! A big Thank You to you!
Kay,
You are amazing – I have watched all of your videos, and I can’t believe how much I learned and how many things you showed me that I didnt even know Silhouette software could do. There was a guy from the UK on the Silhouette Facebook page that wanted to know how to marry text along a line/shape, and I told him about your Text To Path Power User video. I hope he sees my post.
Thanks again, Janis
another fab lesson. I knew there was more to be done with the knife and not i don’t have to figure it out by myself.
thanks!
Haven’t been following your blog very long. I can see I need to dig into your archives! I am a relatively new silhouette user and recently upgraded to the Designer Edition. I learned a bunch from this one video and need to take some time to learn all that this amazing tool can do. Thanks so much for this lesson.
And, did you know, you can draw left to right or right to left? It only matters if you’re using one of the serrated (although they look like wonky scallops to me) options – lt to rt = bumps on bottom; rt to lt = bumps on top! 🙂
Cool! Not what I would have expected. You can also rotate or flip to change the orientation and have it consistent, which I often use on the scallops. Completely forgot to include it. Thanks for bringing this up.
Kay, THANK YOU. I TRULY appreciate the time you put into making these videos. I’d like to think I’m fairly savvy with the software, but I ALWAYS learn something from you. Thank you again!
This is brilliant, thanks so much for putting this video together. I wish I had watched it two days ago, I learned sooooo much
Thank you. The examples are so helpful. The knife tool was a mystery to me, and now I see a lot of potential for using it!
I’m.. speechless. This absolutely amazing, and actually makes me *want* to use the knife tool. Thanks so much for sharing!!
You are A-M-A-Z-I-N-G !!!! Thank you for sharing this very detailed description of the knife tool. I can’t believe what I just learned — thanks to you.
Cool! Thanks!
thank you very much. i hope it was alright to ‘share’ this good information.
Absolutely, sharing links to any posts here is highly appreciated. Thank you!
Jenny is NOT your #1 fan! :p I * AM * !!!!
Fantastic video! I’m a very new user and am excited to start experimenting! Thanks so much!
Kay, Thank you for the Knife Ninja video. Watched it 2 already but am still having trouble with my knife. I have Silhouette Designer Studio Cameo. Most of the time my knife it will not cut cleanly. It leaves a tail. The eraser leaves a big tail too. And lots of time the knife will not let go and stop cutting. It acts like it is stuck to my file. I have a picture of what it does I can send you if you need to see an example. I am beyond frustrated as I am unable to tell why it works when it does work and why it wont work other times. I was so excited that it worked after watching the knife video but my joy was short lived as it only worked on one file and not another. I am embarassed to ask for help but I am also desperate. Thank you for your time as I am sure you are inundated with needy notes.
I remain in awe of your sharing heart,
Mary Morand
What a fantastic video. It never occurred to me that I could do all those things with the knife tool. Thanks for the tutorial.
Thank you for all your help