Update: A newer version of this post is available here
Congratulations to all those who got a new Silhouette machine for Christmas. No doubt you are anxious to get started…or maybe you are just anxious. Either way, here are some things I wish I had known from the get-go.
-Every machine is different. The settings in Silh Studio or that you get from others are suggested starting points. You should do your own test cuts to determine what is right for your machine, blade, material, climate, etc.
-The mat starts out waaaayyy too sticky and it WILL eat your paper or the backing on your vinyl. Then it quickly goes to not sticky enough. This is frustrating but you will learn to keep several mats on hand at different levels of stickiness for different things. Before the first cut on a new mat, “de-sticky” it by patting it with a clean t-shirt. Then use heavy card stock for the first few cuts because it is easier to get off the mat.
-There is a button and/or indicator on your machine for Load Mat (or Carrier) vs. Load Media. Pay attention to this and check it before every cut, even if you didn’t change anything! This is the number one source of cutting errors, and is easily prevented.
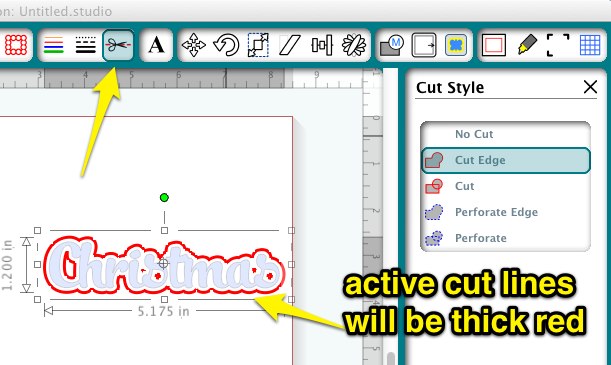
-The Cut Styles window (horizontal scissors with red line button) gives you a sort of cut preview and you should check it before every cut to avoid surprises. Often you will need to turn cut lines on here. This is another source of easily avoidable errors.
-Pens are a great way to test “cut” and just to learn how the machine works. The character marker sets in the dollar section of Target, Michaels and Walmart (also Dollar Tree) fit the Silh machines perfectly with no adapters necessary so they are perfect for this. You can use a piece of card stock with no mat so you are not wasting paper, blades or mat adhesive while you experiment.
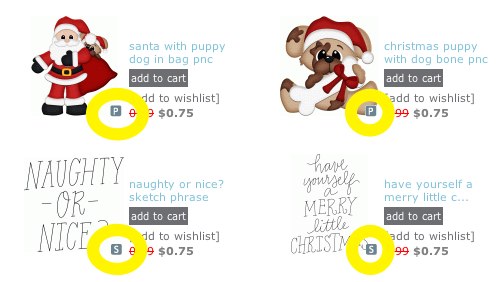
-The designs from the Silh store are regular cut files UNLESS they have a small S for sketch or P for Print and Cut beside them. You will not be successful cutting a sketch file, and probably not a print&cut file either. Pay attention to the codes until you get to the point where you can tell them apart just by looking at them.
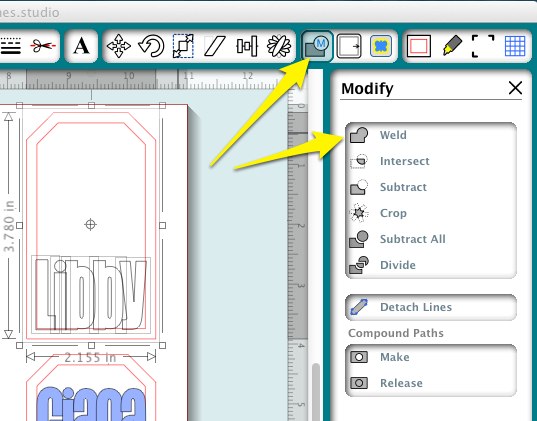
-When you want to remove the lines between overlapping letters or shapes, that is called “welding” and there is a button for that on the Modify panel or you can right click.
-If you want to fatten up letters or make layered “mats” that is called “offset” and it has its own button that looks like a square with an arrow. The size of the offset is adjustable with the slider or by entering numbers or toggling the arrows.
-If you are unable to move objects smoothly on your mat, then go to the Grid window and uncheck “Snap to Grid”
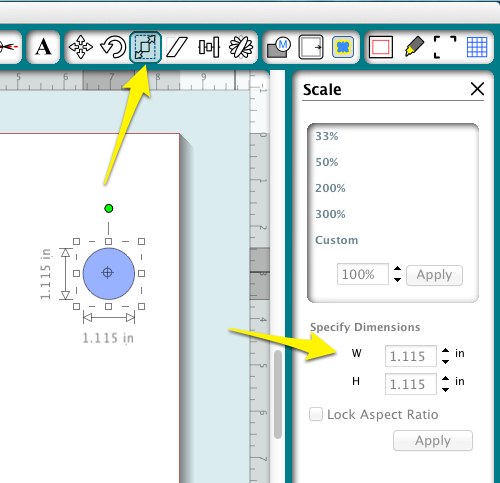
-You can set a shape to any dimension using the Scale window. The button has diagonal arrows on it.
-All Youtube videos are not created equal. Seek out recommendations for the best ones, or stick with reputable channels like Under A Cherry Tree , Doodling Debbie and of course CleverSomeday.
-Vinyl is easier to cut than paper, but people are scared of it because it is more expensive. Do not be afraid of vinyl (except maybe Silhouette brand, which is junk), but do learn about kiss-cutting and transfer paper. You will quickly be addicted. Contact paper (adhesive shelf liner) is a type of vinyl and can be substituted for many vinyl tasks like practice cutting and stencil making. If you can get scraps from a sign shop, that is perfect, too.
-Try some easy projects first like simple cards or single layer vinyl. The following are NOT easy projects : Split letters, lettering on ornaments, layering on cutting boards, many-layered paper piecings, designs by Kim Bright, tracings of photographs, double-sided print and cut or anything very detailed that is cut very small.
Think of it like diving. You would start with a jump and then a simple head first dive and work your way up over time before attempting a triple gainer.


I have an image that I made up in Silhouette Studio based on a tattoo that I have. It cuts fine in Vinyl, but I’m trying to fill the image with a color. That image would then be sent off and used to make a drink coaster. For some reason (which I’ve tried everything under the sun to correct) one part of the image won’t fill in with a color. Any ideas on where I can go to get help with this?
Junior, When a shape won’t fill it means the path is broken and there are 2 forms that can take. You can find information on how to fix broken paths in parts 7 and 8 of my series Tracing without Tears on Youtube.
Hi! I just bought my cameo and received a few vinyl rolls from Silhouette. If you do not recommend their vinyl, do you have other recommendations? I have ordered a large amount from BOGO Vinyl as well.
This is an amazing blog and great work