Update: A newer version of this post is available here
Congratulations to all those who got a new Silhouette machine for Christmas. No doubt you are anxious to get started…or maybe you are just anxious. Either way, here are some things I wish I had known from the get-go.
-Every machine is different. The settings in Silh Studio or that you get from others are suggested starting points. You should do your own test cuts to determine what is right for your machine, blade, material, climate, etc.
-The mat starts out waaaayyy too sticky and it WILL eat your paper or the backing on your vinyl. Then it quickly goes to not sticky enough. This is frustrating but you will learn to keep several mats on hand at different levels of stickiness for different things. Before the first cut on a new mat, “de-sticky” it by patting it with a clean t-shirt. Then use heavy card stock for the first few cuts because it is easier to get off the mat.
-There is a button and/or indicator on your machine for Load Mat (or Carrier) vs. Load Media. Pay attention to this and check it before every cut, even if you didn’t change anything! This is the number one source of cutting errors, and is easily prevented.
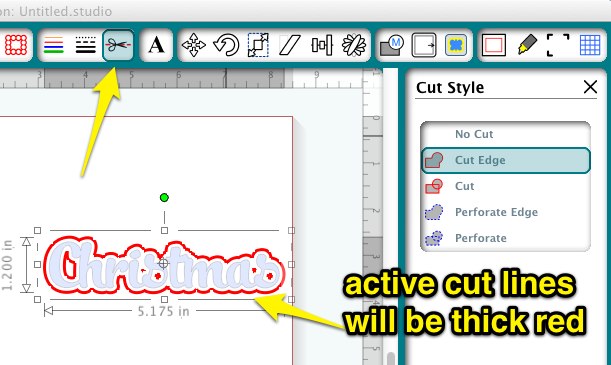
-The Cut Styles window (horizontal scissors with red line button) gives you a sort of cut preview and you should check it before every cut to avoid surprises. Often you will need to turn cut lines on here. This is another source of easily avoidable errors.
-Pens are a great way to test “cut” and just to learn how the machine works. The character marker sets in the dollar section of Target, Michaels and Walmart (also Dollar Tree) fit the Silh machines perfectly with no adapters necessary so they are perfect for this. You can use a piece of card stock with no mat so you are not wasting paper, blades or mat adhesive while you experiment.
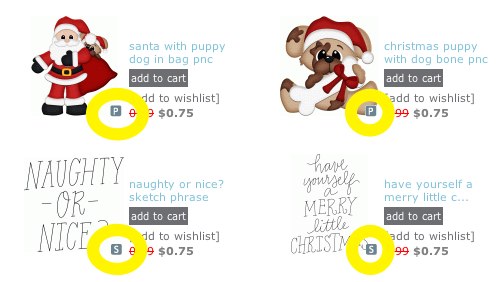
-The designs from the Silh store are regular cut files UNLESS they have a small S for sketch or P for Print and Cut beside them. You will not be successful cutting a sketch file, and probably not a print&cut file either. Pay attention to the codes until you get to the point where you can tell them apart just by looking at them.
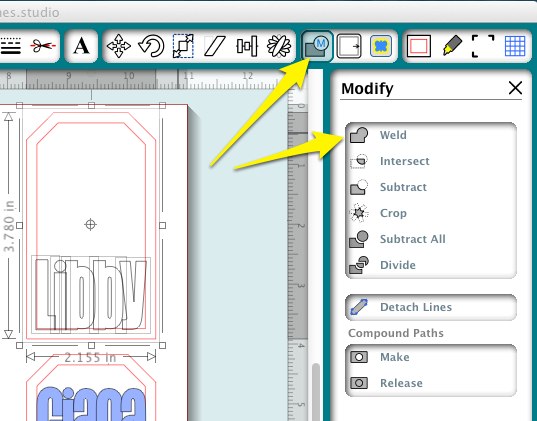
-When you want to remove the lines between overlapping letters or shapes, that is called “welding” and there is a button for that on the Modify panel or you can right click.
-If you want to fatten up letters or make layered “mats” that is called “offset” and it has its own button that looks like a square with an arrow. The size of the offset is adjustable with the slider or by entering numbers or toggling the arrows.
-If you are unable to move objects smoothly on your mat, then go to the Grid window and uncheck “Snap to Grid”
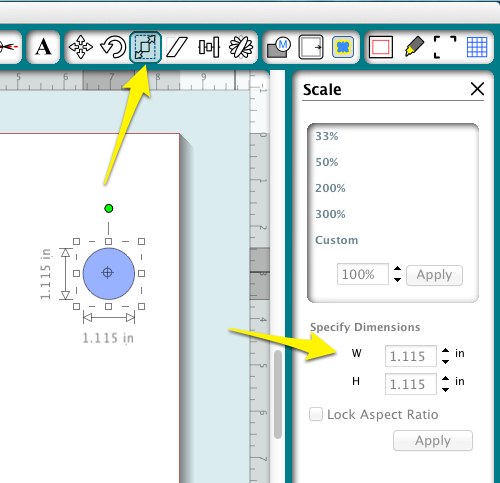
-You can set a shape to any dimension using the Scale window. The button has diagonal arrows on it.
-All Youtube videos are not created equal. Seek out recommendations for the best ones, or stick with reputable channels like Under A Cherry Tree , Doodling Debbie and of course CleverSomeday.
-Vinyl is easier to cut than paper, but people are scared of it because it is more expensive. Do not be afraid of vinyl (except maybe Silhouette brand, which is junk), but do learn about kiss-cutting and transfer paper. You will quickly be addicted. Contact paper (adhesive shelf liner) is a type of vinyl and can be substituted for many vinyl tasks like practice cutting and stencil making. If you can get scraps from a sign shop, that is perfect, too.
-Try some easy projects first like simple cards or single layer vinyl. The following are NOT easy projects : Split letters, lettering on ornaments, layering on cutting boards, many-layered paper piecings, designs by Kim Bright, tracings of photographs, double-sided print and cut or anything very detailed that is cut very small.
Think of it like diving. You would start with a jump and then a simple head first dive and work your way up over time before attempting a triple gainer.


Great advice.I learned all this the “hard way”.Thanks!
Got mine for my birthday beginning of December I have watched you videos on cut lines for my stamped images, successful scan and trace to create my offset outline, but my question is as I have my sketch pens and copics can I sketch the image and cut without using my printer as my printer ink bleeds on my copics have saved all my sections but have browsed for ages on your blog and cannot see this hoping you can help
Thanks Kate xx
Kate, if your scanned image has thin enough lines you can sketch it with the offset set to no cut, then without removing the mat, switch to the blade, set the sketch to no cut and the offset to cut, and cut. I have several examples on the blog where I have done this. If the image is not thin enough, you will see that the sketch has double lines, and you probably won’t like it.
thank you, I did try this and did get the double line effect after taking down the trace to it’s lowest it then worked better but then missed one of the main lines out. I suppose that it is getting the adjustment right. I then tried to use your template method, I had my registration marks clearly marked on the stamped image but it would not pick them up. I have read that this is because it may be too dark where I have it, so going to try again this morning giving it some more light. Think your blog is fabulous, so helpful for those of us who are new to the cameo and want to get the most out of it. thank you so much
Kate x
Kay – I’ve had my Silh Cameo for about 16 months. I am still learning new things. Thanks for all the tips.
I’ve had my machine a year and learned a couple of things! As usual, awesome post. Thank you for your efforts!
You have by far been the best instructor I have had. thank you so much for sharing your expertise.
Newbie here….trying to figure out how to get my silhouette to make normal letters with the sketch pens instead of outlining it as if it was going to cut it out with the blade. I’m sure its an easy setting, I’m just lost.
Tisha, it is following the same lines that it would to cut, which does not give the desired result for sketching in most cases. I have lots of information regarding that issue here http://cleversomeday.wordpress.com/ttfs-for-diecutting#penfonts
Have you had your machine go crazy and not print/ cut straight ?I load my paper and its all lined up and than the machine starts acting crazy. I called 1800 and left a voicemail. I would love to get past this and start having fun… Any trouble shooting advice ?
I get faster results emailing support@silhouetteamerica.com also check here http://www.silhouetteamerica.com/faq/topic/silhouette-troubleshooting
This is just a shot in the dark but … Did you make sure the blue lever on the right side is flipped upward? That lever applies/releases pressure to the rollers, so the paper is held down firmly. I’ve had my cuts go all wonky, when I forgot to flip down that lever.
(When you flip open the lid, it’s to the left of the controls).
Oops! I mean flip UP that lever!
Kay-Once again thank you so much for all of your wonderful information and videos.
Got my machine for my birthday in December but haven’t had a chance to break it out of the box yet. I’m really excited but scared to death! I decided to scour pinterest for tutorials, etc. So glad I found you! I can tell you’re going to be an amazing source of info. Puts my anxiety at ease a bit. Thanks so much!
Hello Kay
Thanks you for your great tips.
I have one tip for you as well. After ruining a LOT of pearly sheets I finally tried rubbing it with a tumble drier sheet. It seems to lubricate the knife and it glides easily now.
That is a trick we used to rub the parchment when embossing.
Again thank you for your YouTubes etc. They have been very helpful.
Yours truly
Ulla Madsen
Queensland Australia.
I LOVE my Silhouette Machine and can’t imagine living without it. That said, their INSTRUCTION VIDEO is so lame and uninformative it’s not funny. I have had my machine for about 6 months and never knew about the Load Matt versus load medium feature. I love the idea of having various cutting matts with varying degrees of stickiness. Thank you so much for taking the time to share with others these wonderful tips. PINNED this to my Silhouette Cameo board! Newest follower!
Thank you so much for the tutorials! I tried very hard to figure a few things out myself and the only thing that happened was pure frustration! :o). I am also interested in “kiss cutting”. Is the load media when you load vinyl without a mat? I am a mat user so I never thought how you would load vinyl without the mat!
Thanks again you are an awesome teacher!
Great tips! I think I found this info in my beginners facebook group as well! Your name doesn’t seem to appear on your blog so I don’t know who you are to credit with this info – but thanks!
what are the details of the beginners facebook group as looking at buying a cameo but doing my research first?
Kay I find your blog and tutorials extraordinarily helpful, thank you. I am having trouble with one aspect of your helpful hints. I can’t seem to find any way to enter dimensions on the grid screen. My only options are: show grid, or snap to grid. Are you using the basic software or is this only an option in the designer edition?
Shelley,
Dimensions are entered on the Scale Panel, not the Grid Panel and this works in standard or Designer Edition.
I found it! Thanks so much! Have my cameo for a year and never knew this, you are awesome!
What a great, informative post. Thank you. Came to your blog via your YouTube Tracing w/out Tears series. You are a brilliant, natural instructor. Thank you, thank you, thank you!
Kay am so glad I found your blog. I have a big shot and recently stumbled across the cameo and have been looking for information for a few days so found you useful tips very helpful. Am looking into whether this machine is for me but am from the UK and there only appears to be one craft shop that sells it and I would like to see it in action before I buy!
Thank you so much for the valuable information and for taking the time to share!
Kay, I am ever so glad I found you and your fabulous videos I just barely started to watch. I am interested in cutting fabric and doing stencils preferably using freezer paper to start. Just got my Cameo this past christmas so I am very new to cutters in general. I didn’t know they existed until recently! lol Was busy learning how to use an embroidery machine. And I will not talk about how bad I am at the pc.
Anyway, thanks for sharing all your knowledge and hard work.
Hi ,My name is Pauline and I live in the uk, I have recently purchased a cameo and am delighted with it ,I loved the information about the pens ,do you know where I can purchase the same in the uk.I am hesitant to buy the silhouette pens and holder till I know abit more .Thankyou so much for sharing this valuable information I too am in my 60s so I appreciate any help I can get .x
Pauline I do not know any sources for the markers in the UK, but hopefully another of my readers will chime in with some info for you.
Thanks so much for replying Kay, I will try one of our pound shops to see what I can find x
Do you have any advise on how to combine multiple tabs (layouts) in Silhouette Designer Series Software into one file? I want to layout a project that requires many pages to cut and I do not want to keep moving images off and on the virtual mat.
I am new to e-cutters so any help is appreciated.
Unfortunately, this is not a feature of Silhouette Studio at this time. I hope you will join me in asking support@silhouetteamerica.com for layers and/or multipage documents. In the meantime you might find it helpful to use sequential naming to keep your files together and/or make a subfolder for each project.
This was extremely useful and easy to understand. Thank you.
Great post, Kay! I’ve used a Craft-Robo for years, which didn’t have the “Load Media/Load Cutting Mat” option. I finally broke down and bought a Silhouette Cameo recently. Add me to the list of people with a slice all the way through the edge of their cutting mat. I plan to repair it with a strip of clear packing tape on both sides. When I saw the nice clean slice, I thought “Whoa, this thing will cut through acetate? Cool! I can make rigid stencils for project life cards!” I tried it, but wasn’t able to duplicate the pressure that cut through the mat. It’s possible I was using too thick of acetate. I don’t want to ruin the blade, but I would love to cut some acetate stencils that are not flimsy.
Thanks for the great tip about the Disney markers! I spent a bit of cash trying to find markers that fit. And on copper coupling/rubber grips to rig up my own custom jig to hold various size pens/pencils/markers. In the end, I discovered the Silhouette pen holder (with 2 screws) is only $9 on Amazon! Sheesh! Why did I bother?!
One tip that I would add to your list is: Silhouette Cameo usually ships with the standard Silhouette Studio software. I fussed for a long time trying to erase a line in my artwork, or other tasks I thought were pretty basic. I finally realized that I had to purchase Silhouette Studio DESIGNER edition, to edit my artwork within the program. Designer Edition is pricey, I think, for customers who just paid hundreds of dollars for the machine. That’s kinda cruddy, if you ask me. But you can search online and usually find some kind of special promotion or discount code to get it for 30% off (or more).
Gosh, I practically wrote a whole blog post here! Sorry!
I have no idea how I got here but I tell you, your site was meant to be found by me today 🙂 I believe that there are no coincidences in life lol. I just got my portrait last week and I found the mat to be very sticky too despite my using thick card stock for the first ever cut. Your tips and tutorials are just AMAZING. I have much to learn from this site, thanks for your generosity!
Thanks for all the great tips on your website! I’ve had my Silhouette SD for a few years now and I’m still excited to learn new ways to use it. The new blade system is SO much better than the original that came with my machine. And Silhouette Studio just keeps getting better and better. I do use Cricut mats, though. I feel they work much, much better than the Silhouette ones.
When you say that Silhouette brand vinyl is bad, is that because of the adhesive on the back of it? And if so, can you recommend a different brand that is better in this aspect?
Silhouette brand vinyl is difficult to cut and apply. Oracal is an excellent brand. You can get sheets of Oracal 631 (removable for walls) sold under the Brookie label at Joann but other than that you need to order it online.
Don’t forget to always use a coupon for that vinyl at Joann’s, too, because at $2.99 for 2 ft, it’s expensive. Fotobella vinyl is Oracal, btw, and they run free shipping and send coupons for new customers. Their customer service is fantastic, very personal and quick! The Silhouette Black Friday price can’t be beat, so I’m going to try it, because I’m not seeing a difference between some no name vinyl I was given and my Oracal. Also, my shopping cart is broken and won’t let me delete items, so at this point If I don’t like the first roll, I’ll return the rest. I appreciate the warning. At least I know to open a 9″ roll only.