Update: A newer version of this post is available here
Congratulations to all those who got a new Silhouette machine for Christmas. No doubt you are anxious to get started…or maybe you are just anxious. Either way, here are some things I wish I had known from the get-go.
-Every machine is different. The settings in Silh Studio or that you get from others are suggested starting points. You should do your own test cuts to determine what is right for your machine, blade, material, climate, etc.
-The mat starts out waaaayyy too sticky and it WILL eat your paper or the backing on your vinyl. Then it quickly goes to not sticky enough. This is frustrating but you will learn to keep several mats on hand at different levels of stickiness for different things. Before the first cut on a new mat, “de-sticky” it by patting it with a clean t-shirt. Then use heavy card stock for the first few cuts because it is easier to get off the mat.
-There is a button and/or indicator on your machine for Load Mat (or Carrier) vs. Load Media. Pay attention to this and check it before every cut, even if you didn’t change anything! This is the number one source of cutting errors, and is easily prevented.
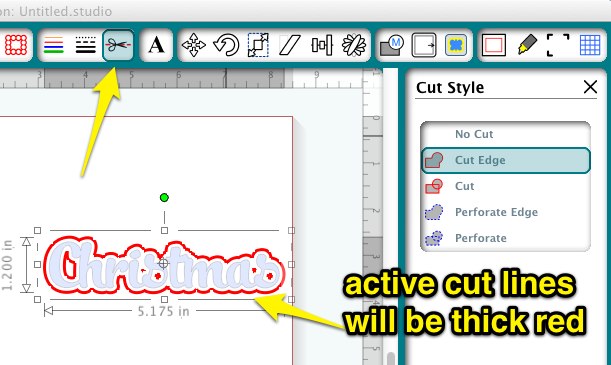
-The Cut Styles window (horizontal scissors with red line button) gives you a sort of cut preview and you should check it before every cut to avoid surprises. Often you will need to turn cut lines on here. This is another source of easily avoidable errors.
-Pens are a great way to test “cut” and just to learn how the machine works. The character marker sets in the dollar section of Target, Michaels and Walmart (also Dollar Tree) fit the Silh machines perfectly with no adapters necessary so they are perfect for this. You can use a piece of card stock with no mat so you are not wasting paper, blades or mat adhesive while you experiment.
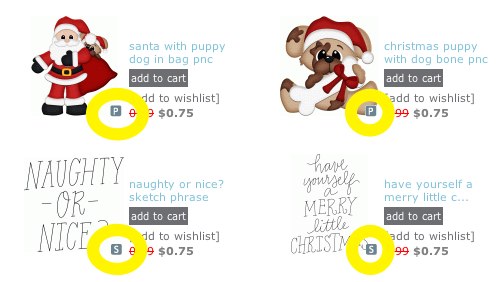
-The designs from the Silh store are regular cut files UNLESS they have a small S for sketch or P for Print and Cut beside them. You will not be successful cutting a sketch file, and probably not a print&cut file either. Pay attention to the codes until you get to the point where you can tell them apart just by looking at them.
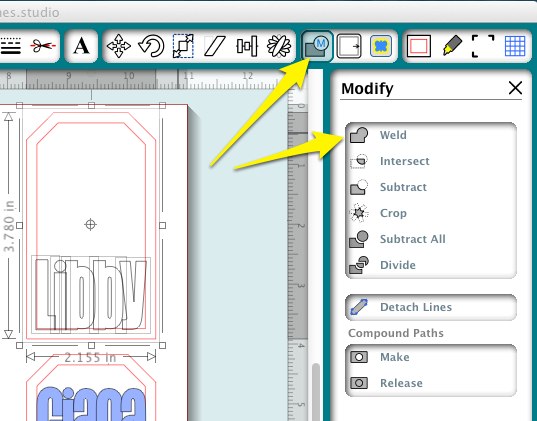
-When you want to remove the lines between overlapping letters or shapes, that is called “welding” and there is a button for that on the Modify panel or you can right click.
-If you want to fatten up letters or make layered “mats” that is called “offset” and it has its own button that looks like a square with an arrow. The size of the offset is adjustable with the slider or by entering numbers or toggling the arrows.
-If you are unable to move objects smoothly on your mat, then go to the Grid window and uncheck “Snap to Grid”
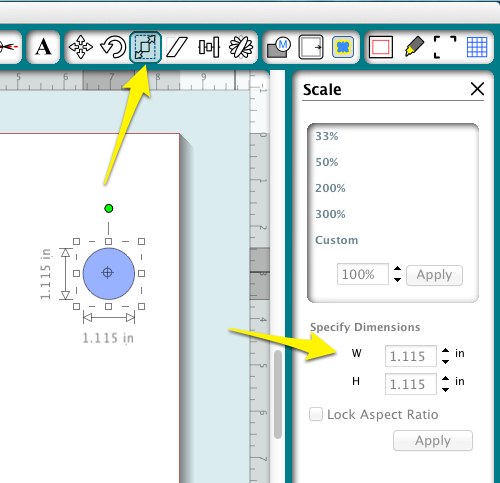
-You can set a shape to any dimension using the Scale window. The button has diagonal arrows on it.
-All Youtube videos are not created equal. Seek out recommendations for the best ones, or stick with reputable channels like Under A Cherry Tree , Doodling Debbie and of course CleverSomeday.
-Vinyl is easier to cut than paper, but people are scared of it because it is more expensive. Do not be afraid of vinyl (except maybe Silhouette brand, which is junk), but do learn about kiss-cutting and transfer paper. You will quickly be addicted. Contact paper (adhesive shelf liner) is a type of vinyl and can be substituted for many vinyl tasks like practice cutting and stencil making. If you can get scraps from a sign shop, that is perfect, too.
-Try some easy projects first like simple cards or single layer vinyl. The following are NOT easy projects : Split letters, lettering on ornaments, layering on cutting boards, many-layered paper piecings, designs by Kim Bright, tracings of photographs, double-sided print and cut or anything very detailed that is cut very small.
Think of it like diving. You would start with a jump and then a simple head first dive and work your way up over time before attempting a triple gainer.


SO helpful. Thanks so much. I feel ready to ‘dive in’- head first. =)
Thank you a zillion times!
Thank you for your help, and most important keeping it simple..
I am wanting to buy a Silhouette….BUT…what to buy..where to buy it, etc! HELP!!!!
Thanks for the tips. I am so frustrated at how fast the mats lose their adhesive.
Kay, I’m from Pretoria South Africa, and after reading this page, watchin 1 of you video’s…… I could give you a big hug. I have my machine nearly a year, but it has been mostly in its box, as I battled with it thinking i needed more grey matter hehe Thanks to you, it is coming out again 🙂 Will start of as a newbie at 60
Officially I’m hooked…. and signed on as follower not to miss out on anything! God bless you, hugs Charlie
Hi Charlie,
I’m also from South Africa, Durban, am also a newbie at 65 and am also battling a little with my new Silhouette. So will start following Kay’s blog and hope to get a little further than just looking at my machine which sits covered in its beautiful pink cover on my desk ! I wish there was someone in the area who could give tutorials.
I’m at the finally chose Silhouette over the new Cricut stage. That’s all I know at all. I simply want to cut fonts. That’s it. I don’t scrapbook or make greeting cards. So I chose silhouette. But now I am kinda freaking a bit. Do you have an “I know nothing and just got mine, so what first?” post?
In general, my stuff is for intermediate to advanced users. Try silhouetteschool.blogspot.com for good beginner tutorials.
Thanks so much for this info!
Thank you for sharing your knowledge, very thankful.
Hi kay I have just upgraded to the cameo from the portrait I am beginning to wish I had not. it just will not recognise registration marks at all no matter what I try do you know of a tutorial for it please? xxx
Many of us are having this issue with V3. If you have tried all the troubleshooting tips here http://www.silhouetteamerica.com/faq/solution/registration-mark-reading-or-print-cut-misalignment-issue and not found a solution, I recommend rolling back to v2.9.45.
Hi Kay…. just wondering if you had any word if mac users will ever get the ability to open files in SSDE by dragging to the icon in our docks back… I saw 3.1 is coming soon, any chance it might be in there?
No word on what fixes/feature restores will be in there. Anxious to find out.
Thanks for the info.
This is amazing information. Thanks so much
Just found your videos and they are amazing. Also, love the tips for new users. I’ve only had mine for 3 days and really appreciate your site.
Awesome this is great advice!
I had the problem of paper sticking to my mat when I first used my machine, but then got over that and cut a few birthday cards that look like a birthday cake. Then, when I went to cut another. It would not cut. Kept saying “Cut Successful” although it hadn’t cut anything. I have contacted Silhouette but they haven’t come up with an answer.
I need help. I have saved my files on a drive. However, when I try to open the file in Sil it does not open. What am I missing?
Try using the FIle>Open command from within Silh Studio and if using the Windows version choose All Files from the pulldown menu at the bottom of the dialog window.
I also need help or a tip. I can´t cut a border on the silhouette. It does´t cut 12 x 12. Doesn´t cut a inch around the paper.
Sonia,
If your design is inside the red cutting margin but not actually cutting then this is a known V3 bug. Go to Preferences>Defaults and check “registration marks off”. If that doesn’t work, contact support@silhouetteamerica.com for further instructions.
Why does my artwork only trAce halfway when I select it?
This is a bug in V3. Try making your trace box extra long below the image or resizing your image before the trace as a workaround.
I am having a problem when cutting an image. I am using Bazzill cardstock and I cant seem to get the right cutting pressure even though I use the recommended number.
I want to know if it is possible to edit a text design from the Silhouette Online store. Say for instance it is a quote saying “Wonderful summer”. Can I change it to “Wonderful Winter” and will the change be in the same font? Or the wording on a card, eg. change Happy Birthday to Happy Anniversary or something like that?
No, the word art is not editable. You can easily create your own in Silhouette Studio, though. Just type, choose a font, ungroup and arrange the spacing, etc then click weld.
hi
can you please help me the work I have on screen I can’t do anything with it wont move, I’m trying to make my own xmas tags and I’m trying to colour fill but I can’t move anything to do this have you any ideas what I need to do
Try restarting Silh Studio and your computer if necessary.
thank you for the reply I have done both of these things many times and it still wont work
If you have not updated to 2.9.45 or 3.3.277 I would do so. I seem to recall one version 3 that had a bug like this.
Is there a way to right justify my media on the cutting mat? If so, how? Basically I’m printing on 8.5 x 11 card stock in portrait. The paper automatically left justifies on the cutting mat. I know how to change the media/paper size and orientation, but is there a way to get it to right justify? The left side of my mat is getting worn out. I’ve rotated it 180 and worn out the “other left side”. Thanks in advance for any advice…I’ve been googling it and haven’t been able to come up with a solution…
Not officially, but what most of us do is set the paper size to 12 x 12 and then block off an 8-1/2 x 11 section on the right hand side (either with a rectangle, guide lines or just mentally) and place our images accordingly.
Ok. That’s what I was doing in the interim. Guess I’ll keep doing that! 🙂
Was just thinking maybe there was an official way to do it. Thanks for the quick reply!!
I am trying to cut a template that is not from Silhouette. For some reason it is cuttung fine double lines? Any suggestions to remedy this? It’s a shame to put the knife through all that unnecessary cuttin, not to mention the fact that the cut out parts are fragile?
If it is an SVG select all the go to the line styles panel and set the line thickness to zero. The easiest way to do this is slide the slide slightly to the right, then all the way to the left. That should take care of the double lines for an SVG.
If you traced it, getting rid of double lines is more complicated. Please see my Tracing without Tears series elsewhere on this blog.
Kay, in SDE 3.3.277, the rulers on the top and side of my design space have disappeared. I must have turned them off somehow. Can you help me? How do I make them appear again? The folks at Silhouette were no help.
Anna
Click on the grid button and then you will see a place to turn rulers on or off on that panel.
Mine are gone as well. I clicked on the grid tab but once it opens there is nothing that says ruler.
Only DE has rulers. If you had DE, then you may need to re-enter your key code.