Update: A newer version of this post is available here
Congratulations to all those who got a new Silhouette machine for Christmas. No doubt you are anxious to get started…or maybe you are just anxious. Either way, here are some things I wish I had known from the get-go.
-Every machine is different. The settings in Silh Studio or that you get from others are suggested starting points. You should do your own test cuts to determine what is right for your machine, blade, material, climate, etc.
-The mat starts out waaaayyy too sticky and it WILL eat your paper or the backing on your vinyl. Then it quickly goes to not sticky enough. This is frustrating but you will learn to keep several mats on hand at different levels of stickiness for different things. Before the first cut on a new mat, “de-sticky” it by patting it with a clean t-shirt. Then use heavy card stock for the first few cuts because it is easier to get off the mat.
-There is a button and/or indicator on your machine for Load Mat (or Carrier) vs. Load Media. Pay attention to this and check it before every cut, even if you didn’t change anything! This is the number one source of cutting errors, and is easily prevented.
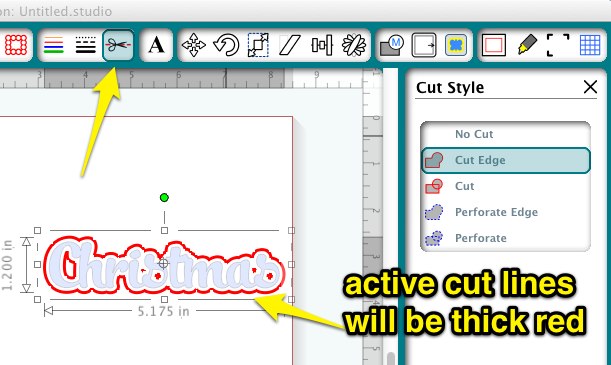
-The Cut Styles window (horizontal scissors with red line button) gives you a sort of cut preview and you should check it before every cut to avoid surprises. Often you will need to turn cut lines on here. This is another source of easily avoidable errors.
-Pens are a great way to test “cut” and just to learn how the machine works. The character marker sets in the dollar section of Target, Michaels and Walmart (also Dollar Tree) fit the Silh machines perfectly with no adapters necessary so they are perfect for this. You can use a piece of card stock with no mat so you are not wasting paper, blades or mat adhesive while you experiment.
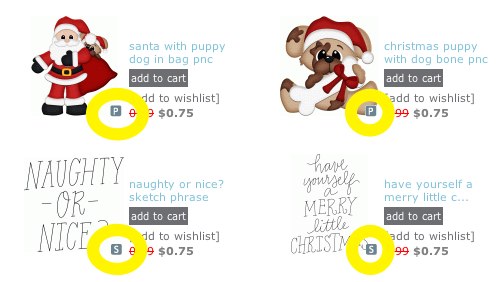
-The designs from the Silh store are regular cut files UNLESS they have a small S for sketch or P for Print and Cut beside them. You will not be successful cutting a sketch file, and probably not a print&cut file either. Pay attention to the codes until you get to the point where you can tell them apart just by looking at them.
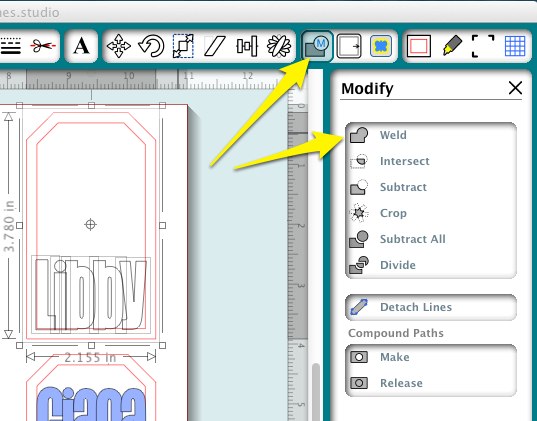
-When you want to remove the lines between overlapping letters or shapes, that is called “welding” and there is a button for that on the Modify panel or you can right click.
-If you want to fatten up letters or make layered “mats” that is called “offset” and it has its own button that looks like a square with an arrow. The size of the offset is adjustable with the slider or by entering numbers or toggling the arrows.
-If you are unable to move objects smoothly on your mat, then go to the Grid window and uncheck “Snap to Grid”
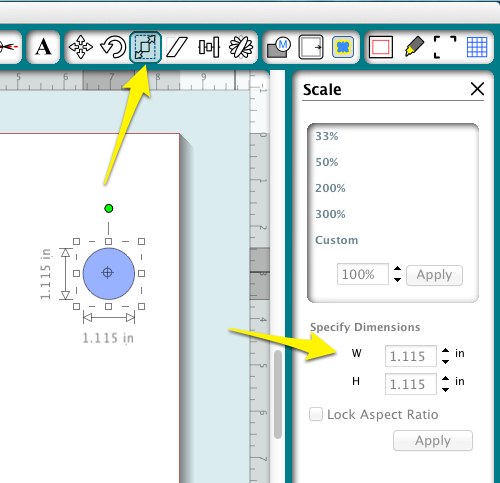
-You can set a shape to any dimension using the Scale window. The button has diagonal arrows on it.
-All Youtube videos are not created equal. Seek out recommendations for the best ones, or stick with reputable channels like Under A Cherry Tree , Doodling Debbie and of course CleverSomeday.
-Vinyl is easier to cut than paper, but people are scared of it because it is more expensive. Do not be afraid of vinyl (except maybe Silhouette brand, which is junk), but do learn about kiss-cutting and transfer paper. You will quickly be addicted. Contact paper (adhesive shelf liner) is a type of vinyl and can be substituted for many vinyl tasks like practice cutting and stencil making. If you can get scraps from a sign shop, that is perfect, too.
-Try some easy projects first like simple cards or single layer vinyl. The following are NOT easy projects : Split letters, lettering on ornaments, layering on cutting boards, many-layered paper piecings, designs by Kim Bright, tracings of photographs, double-sided print and cut or anything very detailed that is cut very small.
Think of it like diving. You would start with a jump and then a simple head first dive and work your way up over time before attempting a triple gainer.


i cant open the store via studio any ideas as tried contacing silhouette but no response thank you in advance
Use your browser instead.
Just got a cameo for Christmas. Had a friend come over to help us learn the machine since she has a Portrait. She couldn’t get the active red cutting line to come up. Could only cut text inside a circle not the circle itself that we wanted. Any ideas where we went wrong? Thanks!
Where can I find the complete owners manual for the new edition of the silhouette Cameo? I am having difficulty saving files to a USB drive.
Good question. I haven’t found any info on this and have heard several reports of problems in this area. Will see what I can find out.
Tech support at Silhouette sent me the following information to save a complete folder of designs. Go to File>Library>Export. To reimport the folder go to File>Library>Import.
my mat keeps slipping around. I have contacted silhouette and doe everything they have told me. no luck any suggestions.
Sorry, I would have told you to contact support 🙁
I bought a silhouette cameo last summer and am still having great difficulty getting started. Does anyone know where you can actually get some “hands on” help with learning how to maximize the use of this machine? I live in Colorado and just need some help so badly. My technological skills leave a bit to be desired. One reason I bought the cameo was because I make a LOT of cards and boxes with Stampin Up products and want to be able to cut out the stamped images. I was told the machine will do that but have not been able to figure out how. Please help this dummy! Thank you so much!
First off, you need to stop that dummy talk 🙂 We all have to start somewhere. Cutting out stamps is done a couple of different ways. The easiest is with the new PixScan mat, but some hands on help would come in handy for that. Perhaps your SU rep might know someone, or check at your local Michaels, etc. Another option is Facebook. There are state specific Silhouette groups that make it easier to find resources in your area.
This is awesome! Hey, is there a way to use both the vinyl you’ve cut out *and* the weeded material (for use as a stencil)? I can’t quite figure out how to make that work. Any ideas?
Also, I have heard many times that you can use contact paper instead of transfer paper. But I have had horrible non-successful moments with that. Any tips on that too?
Dear Clever Crafters,
I want to add one of the Silhouette designs(print and cut) to a tee shirt for Easter. Most of the Silhouette Blogs call for using transfer paper, but I was not happy with the result the last time I tried to do this. Does anyone have any suggestions? Thanks in advance for the help.
Judy, if you want to do print and cut on a shirt, then transfer paper is your only option. If your design is simple enough, you could use heat transfer vinyl instead. You cut each piece from the appropriate color and apply. It is very professional looking and holds up well.
I just found out that transparent Contact paper works great as a transfer paper! You might have to play around with different kinds. The one that works perfectly for me, fresh from the roll is: http://www.bedbathandbeyond.com/store/product/con-tact-self-adhesive-shelf-liner-in-clear/1012126050?mcid=PS_googlepla_nonbrand_storage_&adpos=1o2&creative=39230298469&device=c&matchtype=&network=g&gclid=Cj0KEQiA6ounBRCq0LKBjKGgysEBEiQAZmpvA1dhTxpyQGGgpUuOIVTl7iA4dc5dsKWBMtVxue3W2QgaAn-k8P8HAQ
For stencils or for something you’ll paint over and then pull up, you can also use colored contact paper (but not all types are the same so you might have to try several kinds to get it to work. The kind I settled on is Creative Covering in the Contact brand – I think. The cover paper is long gone but I’m pretty sure that’s what it is.). Anyway, trying a few rolls of contact paper is still much cheaper than using expensive vinyl! (oh, and use blade setting 1)
While I do recommend contact paper as a substitute for vinyl on test cuts and stencils, I do not recommend it as a substitute for commercial transfer tape. I used it exclusively for the first 6 months or so of my vinyl career and once I switched to the real stuff it was night and day difference in ease of use with a negligible cost differential per square foot. Because the adhesive in contact paper sets up over time, I ruined several vinyl pieces that I did not transfer right away. In some climates and with some types of contact adhesive, contact paper can leave a residue on your vinyl, too. So while this is a very common recommendation, it is one I do not make.
Kay I was just reading your post on using gel pens with the silhouette and the Chamos holder that you did back in 2011, I was wondweinf if you had done an update on that since Silhouette came out with the new pen holder that has the three different size pen holders?
Thanks so much! I have a question and I dont know where to start looking. Do you have a tutorial: I want to make a project with multiple names that are all the same size (length and height). Can I draw a table so that when I type the names they all auto resize?
Thank you!
Silhouette Studio’s text boxes do not hold their position, but change based on the length of the text, and it does not have tables. You will need to use the scale panel and/or the alignment panel, along with the letter spacing on the text panel to achieve what you want.
Your site is very helpful!
Your site is excellent! I have been using my Silh for over a year and love it. The best advice I can give anyone is take it out of the box and USE it. I didn’t do that for the first three months because I was intimidated, but the only way to change that is to dive in. You will have mistakes but you will learn something from each one. As a long-time Photoshop user, the main thing on my Silhouette software wish list is the addition of keystroke shortcuts. It would speed up all my Cameo work and just makes sense. Thanks for your excellent videos.
Thank you so much for this! Learned most of this the hard way. Love the marker suggestion. Silhouette pens are so expensive I’ve just stopped incorporating them in my designs.
http://partnparcelstudio.com/
I’ve had my Silhouette 2 whole days and have learned a lot. One tip I might add is when you have a lot of debris left on the mat to clean off, get yourself some of those plastic razor blades and stick one in a razor blade scraper. Works like a miniature bulldozer across the mat.
Where do you find the plastic razor blades, I do not believe I have heard of those.
I just bought a second hand silh. machine & it seems to work very well, except. It does not have a cutting mat (but came with a ton of vinyl- which is what I wanted to use- & it seems that no matter what I change the settings to, it starts cutting about 1/2 into the page & runs off the end. I have googled & checked the settings. Idk if it needs calibrated, but idk what else the problem could be.
Sounds like you have it set to load mat instead of load media.
I’ve used my Silhouette a lot. MOstly with vinyl for stencils which I find a waste. I see that you have used Contact paper for stencils. I have tried that but even on the lowest blade setting of 1, the blade cuts right thru the contact paper and the backing. Is there another setting I need to change? Thx in advance for any tips you can provide. I’m tired of spending a fortune on vinyl for stencils 🙂
Back off on your thickness, or try a different type of contact paper.
I just purchased a Silhouette Cameo today on Amazon for $199.99, it’s a starter bundle but I only plan on using it for cutting stencils so thought that was a great price! I’m wanting to purchase sheets of vinyl to make the stencils but not sure which type to purchase, I want the stencils to be reusable. Someone above mentioned Sign Warehouse so could you direct me to what I need to purchase for a 12 inch roll? Excited!!!!
The people at signwarehouse can probably help you pick something out, based on what you are using the stencils for.
Purchased my Silhouette from Amazon too, today I finally loaded everything, updated the software, updated the firmware, spent 4 hours trying to cut, none of it was successful, the mat is cut up! It decided to go back and cut 12 X 12 when I had it set for 8.5 X 11, that’s when the mat was cut up, after using up a bunch of card stock, I unplugged everything and put it away, so very frustrated right now, thinking about sending it back! UGH!
I am new ;0# and of course experiencing lots of problems. My machine will make a click and not start, but say it’s cutting. THEN, a cursive font I am using Procelin, cuts tiny little HOLES in my font!!! Goodness, what do I do? I’ve cut it now 3 times!
The first problem is usually because you do not have any cut lines activated. Porcelain is a “grunge” font that I do not recommend for cutting, especially for beginners. It has “holes” in it on purpose to achieve the vintage look.
I’ve had my Silhouette since May, LOVE it, anything new is frustrating but its the unknown that is the frustration not the machine. I’ve been in IT support for almost 30 years so I know it takes patience and lots of testing aka playing.
My question is you mention “-The Cut Styles window (horizontal scissors with red line button)” I don’t seem to have this. I have purchased the Designer Edition what am I missing??
For version 3, please see this update of the same post https://cleversomeday.wordpress.com/2014/12/25/to-all-the-new-silhouette-owners-2014-edition/
I apologize if this has been answered. So I’m
Looking to buy the Silhouette Cameo so that my fiancé and I can create some vinyl graphics and stencils for seating charts and signs and such for our wedding. I’ve settled on this brand and was looking at their pricing which I’m fine with. I was looking at their vinyl and find it to be expensive. I have read through most of he comments and seen the links to sign warehouse. I’ve looked at the suggested vinyls. I know silhouette brand vinyl is 9″ wide. Can I still by the Orca 12″ rolls and that be ok, or is there a reason it’s not made at 12″ by the company? Also, would the orca 641 vinyl be ok since we need it for our door display. We eventually want to start a small business probably on etsy after our wedding making signs for others. Sorry again if my question is a broken record and thanks in advance to those that respond!
Congratulations on your wedding! The width vinyl you need would depend on which machine you buy. If you buy a Portrait, the 9 inch width is preferred. If you buy a Cameo, the 12 inch is preferred. Please see this post to help with vinyl selection http://cleversomeday.wordpress.com/which-vinyl.
Do you have any suggestions for making stickers for my planner on vinyl ?
Many people are making planner stickers using full sheets of sticker paper and Print and cut.
I just found your website and can I say you are AWESOME!!! It’s nice to find a tutorial where the person teaching knows what she is teaching about. You have been so much help and now I feel courageous enough to try some new techniques. Thanks so much!
What does “regular cut” mean in the design store? Does that mean I can use it for vinyl and every other material to be cut? Thanks! I just unboxed mine today! 🙂
Yes. A regular cut can actually be used for cutting on any material (subject to size and detail, of course), or converted for print and cut. It can also be drawn with a pen, but since the pen follows the cut of the blade, only the outline will draw. So a regular cut file is versatile and can be used for cutting, printing or sketching, while print or sketch files are limited to their labeled purpose.
where can you find the cutting blade holder. mine came with all sorts of supplies but not the blade or the blade holder. i have two different cricut machines and neither of the housing will fit.
The blade and blade holder are integrated, so it is one part. If you bought new, check the packaging carefully because it will be in the box. If not, you can find the replacement blade/housing at any craft store or online. Also contact Silhouette for a replacement if yours was missing.
I’m a new Silhouette user and I just love your site and videos! Tracing without tears really helped me 🙂