I am enthralled with the drag and drop on SSDE (update: now available in all editions), and love playing with patterns and especially seamless tiles. One disadvantage of pattern fills, though, is that they can’t be recolored.
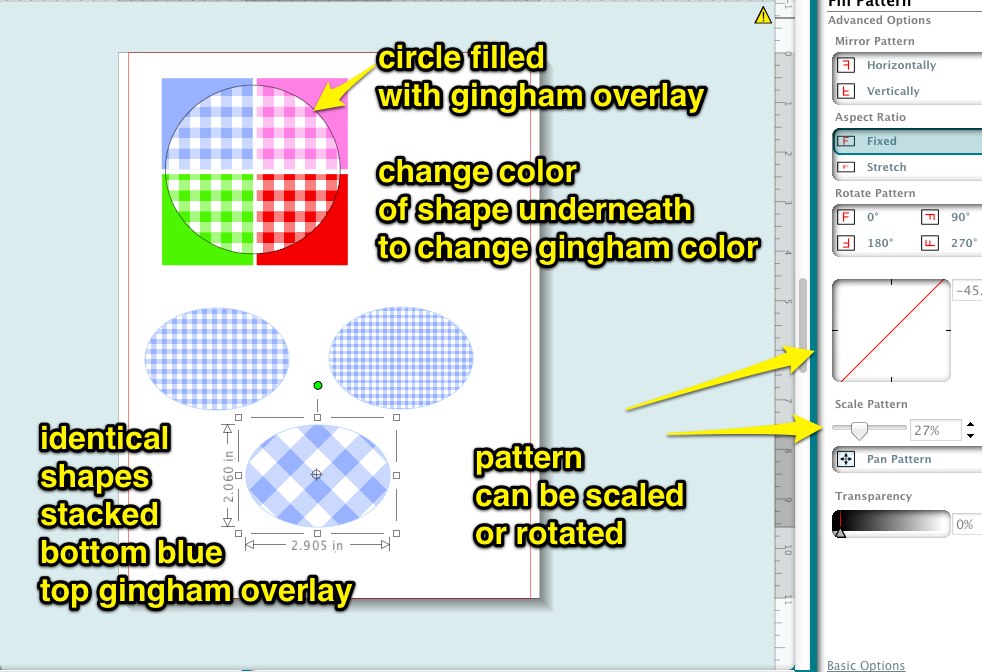
If you use cuttable shapes instead, then you can’t fill your shapes as easily, or change the scale, angle or position after you’ve filled the shape. I got to thinking about some ways around this and came up with transparent tiles that when filling an object stacked on top of an identical colored object, can create a variety of looks.
I’ve created 4 of these tiles for starters, gingham, chevron, honeycomb and houndstooth. I love how many looks can be achieved with these tiny files that won’t bog down SS, and hope you’ll enjoy them, too.
Download the tiles below by right-clicking and choosing “Save Link As…” or “Save Target As” (depending on your browser) to be sure you get the full resolution file. They will not look right on your screen because they are white and transparent, but they will behave properly once you drag and drop them into a shape, or fill a shape by Object>Modify>Crop. Then click the Pattern Fill button (on the top with blue dots) and then the Advanced Options link at the bottom of the panel to reach the scale and rotate controls, etc.)


Tip: If you save these in My Patterns, hover over the swatch in the pattern fill menu to see which is which.
Tip: Fill the bottom shape with a gradient for an ombre look.
Tip: Fill the bottom shape with a pattern and vary the transparency of the overlay filled shape on top for a variety of interesting looks.
Tip: These tiles can be used in SCAL via Appearance>Fill>Pattern then loading the desired tile. They can also be added to your My Patterns folder.
There are dozens of full page size overlays linked over at Mel Stampz. These work in a similar way as the tiles above but can bog down Silhouette Studio because of the large file size so use sparingly.
Update: Video on how to use these tiles is here

Kaye thank you so much for this!!! These are fantastic. One question can the color of the overlay be changed (say the white in the chevron) ? To create a dual color.
Again these are fantastic!!!!
Linda, I can’t make one tile with two selectable colors, but If you open them in a photo editor and change the white to red then that would be a way to have red plus another color as in your example.
Oh, Kaye
I have Photoshope Elements 9 Duhhhhhh I didn’t even think of this.
Thank you so much for all you do!!!!!!!!!!!!!
AWESOME!! Thanks so much for awesome instructions!!!
I love the thought of using these patterns. How and where do I save them though. Thanks so much
Phyllis, save per the instructions below each image. It doesn’t matter where you save them but the downloads folder is one good place.
These are great! I’m new to Silhouette, do you have a video on how to import and use these?
Hi, it took me awhile BUT I got it and they all work, I forgot to size the
pattern — makes all the difference in the world…..
So.o.o.o.o. neat, Shaaron
Thank you! Off to try them out 🙂
Is there a way to make this work in Make The Cut or is it only for Silhouette and SCAL. Any info and direction would be appreciated.
Thanks
Mary
I am not understanding how to use these. Hoping you can do a video. Thanks!
Oh, you are brilliant. I just downloaded and made my first overlay shape with color under it. Thank you so much Kay! Seriously, all your brain cells must be constantly firing! And I really appreciate the practical application of all you share! Can’t wait to use more overlay(ed) shapes!
Thanks so much for these, can’t wait to try them out!
I love this technique. I love using the fill pattern design to fill the colored box. This give it a totally different look. Thank you for sharing.
Does this work in scal 2? To cut the pattern? I have cricut expression, so no printing options. Is there a way to cut a seemless pattern like a wallpaper stensil?
No, Jessica, this is for print only. We are printing with our printers, then cutting with our cutters, which is an option with SCAL2 and a Cricut. You can apply the same principle to cut stencils, but you would need a cut file, not a print file.
I was reading this & thinking ‘man, she is SUCH a genius; I wish my overlays could do this!’ So imagine my surprise to see that lovely link to them. :0) Your knowledge amazes me. My new mission is to resize some overlays so they won’t crash studio. Thank you so much for sharing all that you do! I’d be content to know half as
OK. I’ve never commented on a blog in my whole life but I have to tell you that these have changed my life. I am SO SO happy to have found these! Wahooo! Made my life SO much easier to create what I want to create! Yay for you!
Thanks…what a great idea. Is there a tutorial on how I can create my own overlays?
I don’t get how to use this overlays in scal 2. I was able to download etc. but when I used the fill pattern over shape/ letters its just fills the image with white. Not sure how to scale like you did in silhouette. I don’t really want to cut just print. Trying to make a split chevron letter for monogramming.
Thanks so much for the overlays
This combined tile feature will sort the problem I have when trying to create a repeat pattern and using my embossing tool & matt. No more lines where the patterns join. I’m thinking about getting the upgrade to SCAL 4 now, so will play for a few weeks and let you know how it goes