A while back, I posted Character Map templates for Inkscape and Adobe Illustrator. The purpose of these is to make it quick and easy to make a one page reference map of the main glyphs in a given font, especially dingbat fonts. Today I’m adding a Silhouette version to the lineup.
You can download the .studio template here, download the .studio3 template here and instructions are in the margin of the file, but here’s a quick rundown. As with all my templates, I recommend you store them on your hard drive instead of your library and that you always work from a duplicate. An easy way to do this is to Save as and rename the file as soon as you open it.
Once you’ve opened a duplicate template, click anywhere in the middle of the page. You’ll see a bounding box to indicate that the grid is selected. Click the A button at the top of the screen (not the A button on the side of the screen).
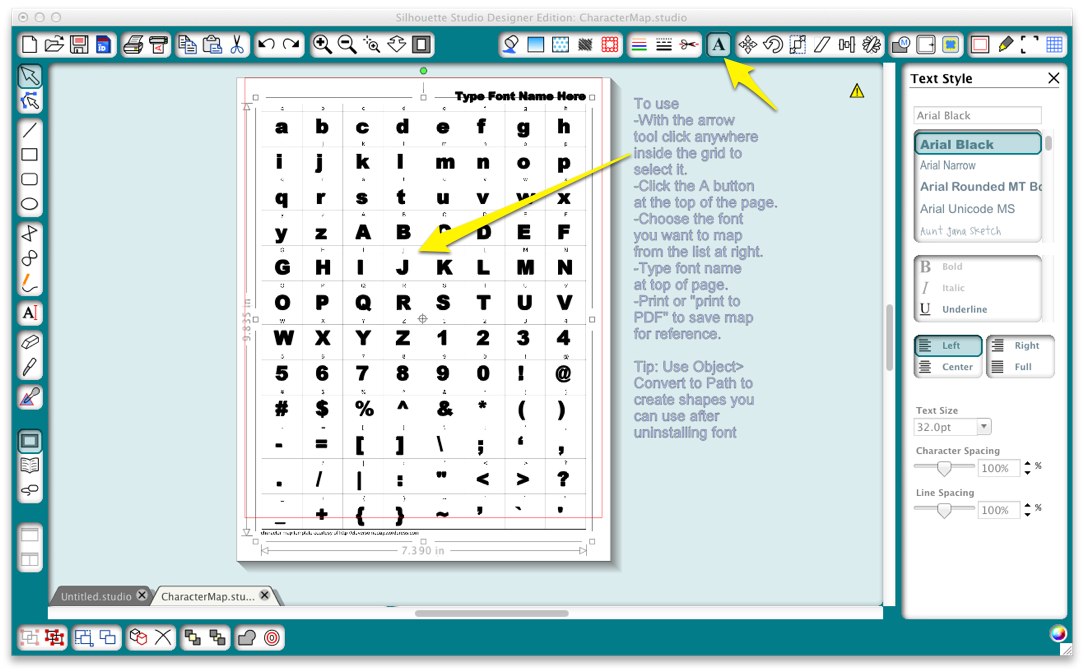
Select the font you want to map from the scrolling list on the right. You should see the characters change to the new font’s. Label the page by typing in the name of the font into the text box provided at the top of the page. This is optional, but will help you remember which font you are looking at.

Here’s what a completed page looks like for my 09kutups font.

You can print the page, print it to PDF or just glance at it temporarily for reference. If you want to be able to use the characters after you uninstall the font, click the center of the page again to select the characters, choose Object>Convert to Path, then save the file.
And if you want some suggestions for great dingbats for cutting, here’s a great place to start. Ten Great Dingbats for Diecutting

Kay, this is so nice to have. Thank you for sharing. You do so much to help others with all sorts of “geeky” stuff. I for one of many appreciate ti so much. You make software more fun. Big hugs and many thanks. Debbie
Thanks so much! Thanks especially for the tip re Object>Convert to Path to save the characters even if I uninstall the font – I’d never thought of that & will use it often!
This is awesome! Thanks so much for posting and sharing this!
Kay, I found you when you posted about Silhouette Studio update. You saved me a lot of grief there. So I signed up for email subscription of your blog. Today I got this post about the character map. I feel so totally dumb. I came to your blog & I’m completely blown away by what I don’t know. I am totally overwhelmed. I saw all the fonts you said can be used for cutting designs. I want to download them but not sure how to use them. I guess I will download one and play with it. Thank you for all you do for us crafters.
Thank you, Kay! I have been using your character map in Inkscape and have made myself a font book to help with dingbat and specialty/novelty fonts. I think of you fondly each time I use it and now I will enjoy this Silhouette version of the character map! Thanks for all the work you do that makes our crafting even more fun! I really appreciate your expertise and your willingness to share it!
Kay, you are a genius and my hero! This will make my life so much easier. Thanks for all the education you provide to this newbie!
This is so great! Thank you.
oh, that is AMAZING!!! Thankyou!!!
Thank you, Kay!!! You are so generous! I don’t know how I would make it trying to use my Silhouette on my own. You have helped me so, so, SO much!!!
I found your blog via Silhouette Plus and I want to thank you for your information. I love software information and appreciate the time and quality of presentation of your blog posts.
Thanks so very much for this fabulous post and all the ideas and tips you share! I would never figure all this out on my own (I would never even imagine most of this on my on, much less figure out how to do it!) Now if you could share how to “cut out” (pun intended) more time to use my Silhouette I would be in craft heaven.
BRILLIANT!!! Thanks for all the knowledge you share!!!
Thanks for this useful tool! One small remark: I had to ungroup it first, afterwards I can use it as described.
hugs serafeena
Kay,
Thank you so much! This is such an easy way to create reference sheets for dingbat fonts. One question (I’m not the sharpest knife in the technology drawer!) What exactly does the tip you give on the template about Object–>Convert to Path mean? If I do that will the objects save in my library without having to keep the font installed?
I think you have just saved my sanity! Thank you SO much for creating and sharing this amazing masterpiece of all that is good and right! I will no longer want to fling my keyboard out of the nearest window because NOW – finally and at long last – I will be able to know what I am typing from those lovely – and until now – useless fonts! A thousand thank yous!
This is great! I’ve just started looking at glyphs and trying to figure out how to get them into SS. I thought inkscape would do it, and I could export to SS, but the only way I could figure out how to do it was to import as a jpg and trace it. Ugh. I’ll start playing tonight.
Kay, thanks so much. This saves me copying and pasting from my computer’s character map because I can’t find the right keystroke! As always, your input is so clear, concise and helpful. The other day I was on FB in a vinyl group or was it Pinterest (hmmm can’t remember) but at any rate, I came across a kind of flow chart you contributed to help decide what type of vinyl was appropriate for a project. As I am new to cutting vinyl I was thrilled to have this information all in one place from such a trusted source. Thanks again for all you do and contribute.
Thanks so much. This is so much easier than what I was doing previously!
Holy Moly! Thank you, thank you! I can’t tell you how amazing this is to have.
I sing your praises all the time, but this is just above and beyond. So helpful! Thank you so much!
This is SO awesome! Thank you!
Thank you, Kay! I really need this one!
Thank you!! Your instructions are so clear and concise! I have one question related to welding the lovely letters together… I find that the inside of the loops disappears. I can remove them then put them back in and weld the whole thing together but is there a simpler way of doing this?
Do not release compound path before welding and you should not lose the loops. If you do lose the loops, select the whole phrase and make compound path and they will return.
Thank you!!