
For many years, I enjoyed writing custom children’s books to celebrate new arrivals or other milestones. I did not enjoy the production phase, however, as I was never able to find a method that produced a nice looking book without a lot of effort and lead time. So my interest waned. Recently, though, the impending birth of my granddaughter got me looking around again, and I’m pretty excited about what I learned.
Maybe I’m the last one to know this, but these days you can buy blank board books, already built and ready for you to fill with the story and/or images you desire. Assuming you are like me, and wouldn’t trust yourself to write or draw directly on the pristine pages, print and cut overleaves provide an easy solution. And I was pleasantly surprised at how nice the result was.
So here are the details…
Get a blank board book (or maybe more than one in case you want to practice first). I know the upcyclers out there are cringing right now, but after bringing home a number of samples from thrift stores and Dollar Tree for testing, I just couldn’t get the results I was after except with the blank. Here are the ones I use, from Amazon:

Blank Chunky Books Hardcover, White 5″ x 5″ (6 Books / Pack) or
1 X 5×5 hardcover chunky book
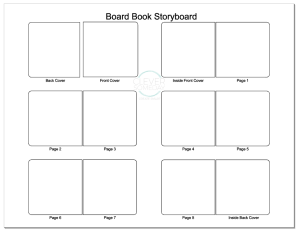
Grab some scratch paper, or your medium or app of choice, and sketch out a storyboard with the correct number of pages for the book. (Trust me, it will be easier if you use the correct number.) My blanks have 4 leaves plus front and back covers for a total of 8 interior pages, so my empty story board would look something like this. (Click on the image to download a PDF copy).
Here is where you can plan out your content, and it’s the hardest part. Expect for it to take a while, don’t try to do it one sitting, and if you get stuck, there’s always Pinterest for ideas.
Measure the size needed for overlays to fit the front cover, back cover and inner pages; and set up your template for each. Be sure you leave a gap in the “gutter” between pages or the book won’t close properly. Test cut to be sure the pages fit well. If you use the same board books I did, I’m sharing my template in both Cricut Design Space and .studio format.
Using your storyboard as a reference, lay out the text and images you want on each page of the template. Be careful not to accidentally resize the pages. I used the StringBeans Color Cut Sets from Lettering Delights for my book. They have hundreds of images that all work great together and can be customized for hair color, skin color and more.
When it comes to printing and applying, you have some choices to make. You can use an adhesive stock, like sticker paper or printable vinyl; or you can use inkjet paper, and add your own full coverage adhesive, such as spray glue or Xyron.
I chose to use matte presentation inkjet paper and apply with Xyron adhesive. I liked having the paper support itself as I positioned it and I know that this paper produces a fairly durable print with my printer. Keep in mind that board books aren’t waterproof anyway, though. Like most baby gifts, the books you make using this process are either going to be a keepsake, or something you let the kid run with, but not both.
Once your media is chosen, you can go ahead and print and cut your pages. If you have a Cameo and a wide format printer, you can print and cut up to 6 pages at a time on 13 x 19 paper, or 4 pages on 12 x 12 paper. With a standard printer and a Cameo or Portrait you can print and cut 2 pages at a time on letter sized paper. Curio or Explore owners will be limited to one page at a time. It’s certainly possible to use a paper trimmer and corner rounder to cut the pages, but the consistency you get with print and cut really makes these books look sharp.
Next you apply your adhesive, if you aren’t using an adhesive stock. I ran each finished print and cut overleaf through my xyron. Now its time to apply them to the blank book.
Getting the pages in position and straight against the book is a little tricky, so I suggest you dry run your technique. I used my thumb and forefinger to serve as stops as I lowered the paper in place. Don’t try to do this part in a hurry. Keep your storyboard handy to be sure you apply the sheets in the correct order!

The final product was one I was proud to give at my daughter-in-law’s baby shower. I look forward to making many more of these in the future, and I hope you’ll give it a try too.


What an awesome project!! I didn’t know you could buy blank board books.
Kay…what a great project! Thanks for sharing your process and sources. You always bring something great and helpful to the table. Thanks again.
Fabulous project.
You are so beautiful and talented. Thank you for all you do for us.
This is brilliant! Thank you so much for sharing!
Love this idea!! Thanks so much for sharing it and your templates!
Kay you are so smart and creative–I aspire to your level of creativity! Your grandchild will be one lucky child.
Thank you will love to try out one day.You are such a talented lady .
Wow- fabulous idea! My mind is turning with the ideas I could use it for. But Amazon is already out of the 6-pack. LOL Is this the same one? (1 pack linked above) I want to be sure because I want to use your template.
Yes it is, and thanks for letting me know. I’ve updated to include the link above.
I think the link above, for board book’s template pages in Cricut DS, is no longer available. Is the template available elsewhere? I’m waiting on my Amazon order of the board book 3-pack to be delivered and would like to get a jumpstart on making my nieces book for this weekend. Your template would be a huge help!!
Hi Kelly, shared links are currently broken in DS as far as the desktop version. Open in the web version and resave then you should be able to open from the desktop. They are supposed to fix this in the next update as I understand it.
Are you using a Mac, by chance? Because we still aren’t able to open the link, whether desktop or web version. We also tried the studio files link. We’re using a PC so were thinking maybe that is our issue.
Mac vs PC shouldn’t make any difference, but I just confirmed that I am able to open the DS project in the browser version, as well as download the .studio file on both Mac and PC.
Kelly, I tried something different to see if I could get around the bug. See if this link will work. https://design.cricut.com/landing/project-detail/5ec6c99c0fed4008207ec47e
Great project! Love this idea! What advice would you have for using photographs as images… print on photo paper for good quality, then stick to the board book pages? And have you found any of the corners picking up at all? So excited to try this!
Stumbled across your blog and just wanted to say, wow — you are so talented!!