Congratulations to all those who got a new Silhouette machine for Christmas. No doubt you are anxious to get started…or maybe you are just anxious. Either way, here are some things I wish I had known from the get-go.
Note: This is an update of my most popular post last year.
-Every machine is different. The settings in Silh Studio or that you get from others are suggested starting points. You should do your own test cuts to determine what is right for your machine, blade, material, climate, etc.
-The mat starts out waaaayyy too sticky and it WILL eat your paper or the backing on your vinyl. Then it quickly goes to not sticky enough. This is frustrating but you will learn to keep several mats on hand at different levels of stickiness for different things. Before the first cut on a new mat, “de-sticky” it by patting it with a clean t-shirt. Then use heavy card stock for the first few cuts because it is easier to get off the mat.
-There is a button and/or indicator on your machine’s screen for Load Mat (or Carrier) vs. Load Media. Pay attention to this and check it before every cut, even if you didn’t change anything! This is the number one source of cutting errors, and is easily prevented.

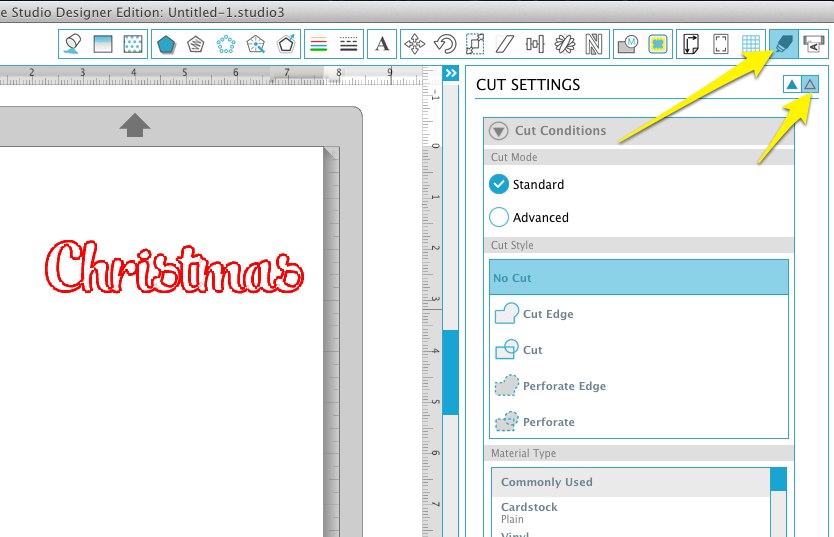
-The Cut Settings window (blade button upper right) gives you a sort of cut preview and you should check it before every cut to avoid surprises. Lines that are set to cut will appear show as thick. Often you will need to turn cut lines on here. This is another source of easily avoidable errors.
-Pens are a great way to test “cut” and just to learn how the machine works. The character marker sets in the dollar section of Target, Michaels and Walmart (also Dollar Tree) fit the Silh machines perfectly with no adapters necessary so they are perfect for this. You can use a piece of card stock with no mat so you are not wasting paper, blades or mat adhesive while you experiment.

-The designs from the Silh store are regular cut files UNLESS they have a small S for sketch or P for Print and Cut beside them. You will not be successful cutting a sketch file, and probably not a print&cut file either. Pay attention to the codes until you get to the point where you can tell them apart just by looking at them.

-When you want to remove the lines between overlapping letters or shapes, that is called “welding” and there is a button for that on the Modify panel or you can right click.

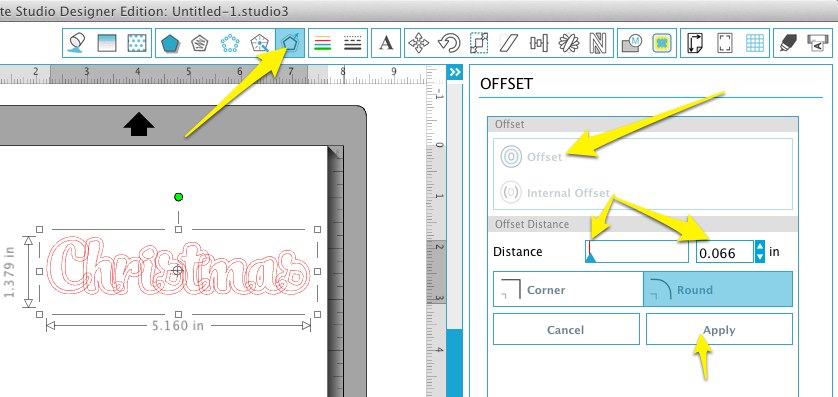
-If you want to fatten up letters or make layered “mats” 0r “shadows” that is called “offset” and it has its own button that looks like a square with an arrow. The size of the offset is adjustable with the slider or by entering numbers or toggling the arrows.
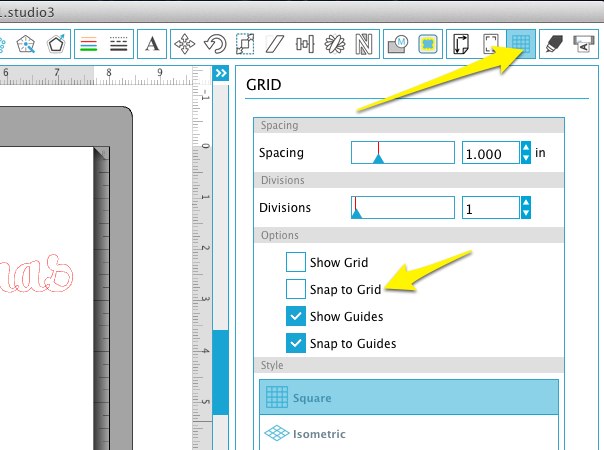
-If you are unable to move objects smoothly on your mat, then go to the Grid window and uncheck “Snap to Grid.” This has a tendency to change for no reason.
-You can set a shape to any dimension using the Scale window. The button has diagonal arrows on it.

-All Youtube videos are not created equal. Seek out recommendations for the best ones, or stick with reputable channels like Under A Cherry Tree , Doodling Debbie and of course CleverSomeday.
-Vinyl is easier to cut than paper, but people are scared of it because it is more expensive. Do not be afraid of vinyl (except maybe Silhouette or paper Studio brands, which are junk), but do learn about kiss-cutting and transfer paper. You will quickly be addicted. Contact paper (adhesive shelf liner) is a type of vinyl and can be substituted for many vinyl tasks like practice cutting and stencil making. If you can get scraps from a sign shop, that is perfect, too.
-Try some easy projects first like simple cards or single layer vinyl. The following are NOT easy projects : Split letters, lettering on ornaments, layering on cutting boards, many-layered paper piecings, designs by Kim Bright, tracings of photographs, double-sided print and cut, projects involving advanced fonts such as Samantha, or anything very detailed that is cut very small.
Think of it like diving. You would start with a jump and then a simple head first dive and work your way up over time before attempting a triple gainer. But do go ahead and get wet!

Thank you! I moved up from my Craft Robo to the Cameo in your post. I’ve always cut from Illustrator and I’m not familiar with the Silhouette software so these tips, your videos and the links here will be a big help. The first thing I did was cut right through the top of my mat! Apparently “load mat” didn’t set the blade where I thought it would – must read user guide 😉
I’m not fond of these thin mats – my others are much more substantial. Would using them change the blade adjustment of cause any other problems?
If you cut a lot of vinyl without a mat, its probably better to stick with the thin mats to keep from spreading your rollers. However, Silhouette’s own PixScan mat is quite thick so this shouldn’t be a big issue. Settings are the same.
I use circut mats, I don’t care for the flimsyness of the silhouette mats myself.
Thanks for these tips. I learned a lot, especially the symbols …I never noticed the P and S to the left of the design. Thank you.
Can you explain the P & S symbols more to me. I don’t understand. Thanks.
P means the file is for printing. There are 2 types of these (that should be further broken down, but aren’t). One is print and cut and includes an image to print and a cut line to cut around it. The other is a printable pattern to fill shapes with from the pattern fill palette. These will usually look like a patterned square.
S means it is for sketching or drawing with a pen in the Silhouette. These are not suitable for cutting because they are too detailed and don’t always make the closed shapes you need to cut paper.
I should add that any regular cut file (no code) can be used for sketching or print and cut, but not the other way around.
Thank you, but I’m still confused. I just got my Cameo 2 on Dec 19th. Upgrading to Designer Edition now, and hope to play with it more this afternoon.
Thank you for this. You amuse me with your humor, and educate with your knowledge – the perfect way to learn! Julie
If you dig around a little on the search menus in the Silhouette Store you can find a set of filters to limit your search options.
Thank you for all your great information.
John in Philly
Kay, I was very pleased to find your blog, since I have a Mac, also. Wish I had discovered you when I got my silhouette three years ago! This post would have been very welcome. Thank you for all your info. It’s helped tremendously!
Thank you so much for all your research on the Silhouette. I appreciate that you share your expertise with the rest of us. I wish I had more time to spend with the machine because it does so many wonderful things. Oh well, maybe after the holidays 🙂
Kay
Your information has been so helpful for a new owner
Thanks so much. Is there a good font for a monogram
That you recommend for beginners using vinyl?
Not too intricate … I tried one on white and had a hard time
With seeing the cut lines on a small monogram I attempted ,
Wasting time and vinyl.
Circle Monogram from fontbros.com is the easiest to cut at small sizes. I would practice with other free fonts first, though. Click the fonts tab for some recommendations.
I have not gotten mine yet. I am so scared! and Excited.
Hi just got mine this month and starting to try and cut a stencil. All my letters are red and showing when I clicked on the Cut styles window that you mentioned. All my letters are red except one that is gray. WHY??? HELP!
Either you did not have it selected when you clicked Cut Edge or the letter is outside of the cuttable area. On the Page panel its a good idea to keep show cut margins checked so you can see where the boundary is.
Thanks for tiis informations is very nice
Can you explain what a kiss cut is?
Kiss cut is this case means cutting through the vinyl layer, but leaving the backing layer underneath untouched. I recommend the intro videos on vinyl cutting and application at myvinyldesigner.com
Thank you, Kay.
Great post. I’ve had a lot of practice with my silhouette but I always learn something new with your posts. Happy New Year!
As the song begins, “Did I ever tell you you’re my hero……?” I’m singing it to you! I was introduced to you thru splitcoaststampers.com and I find you very generous with your knowledge. I am very thankful for you! Your “Tracing Without Tears” series is the Bible of tracing and other techniques and concepts. Now this post is also amazing! I have been so inspired. Have a very Happy New Year and the best life has to offer for 2015.
A great informative, simply written and much appreciated post from one of the best tech helpers I’ve ever “known” on the web. Thanks a million!
So helpful. I have had my machine for a month and was getting frustrated with not being able to move objects smoothly. Had not even investigated the “grid” icon! I would like to be able to create my own cards. ie I have drawn a 10 x 5 rectange (to make a 5×5 card) and have been trying to weld a Silhouette store design onto the card. I have succeeded in putting a border on one edge so it creates a fancy edge card. I would like to put one of the designs into the top corner of my card. Not having a lot of success. Any hints please?
Have you upgraded to V3? I am still using V2 and see no reason to upgrade. But I do value your recommendation and opinions. Thanks so much.
I run multiple versions, but do not recommend upgrading to V3 at this time if you can not also keep V2 for daily use.
Hi, thanks for your tips. I would love to know how to lock the perforation marks within an image before I move them off the square so I can cut in different colours. I have tried lock ratio aspect but it was already checked and didn’t help.
Click and drag around the image and the marks so that they are both selected then right click and Group or control-G (command-G on a Mac) to lock things together for safekeeping.
I’ve been trying to cut the 3M – Gerber vinyles 220’s and am having no luck..any help would be appreciated Thank you!
Sorry, no experience with this vinyl. You may just have to use trial and error, I’m afraid.
Thanks for all the tips. Am a newbie and need all the help I can find. LOL
I’ve owned a Silhouette for years and learned a few tricks!
Thanks!