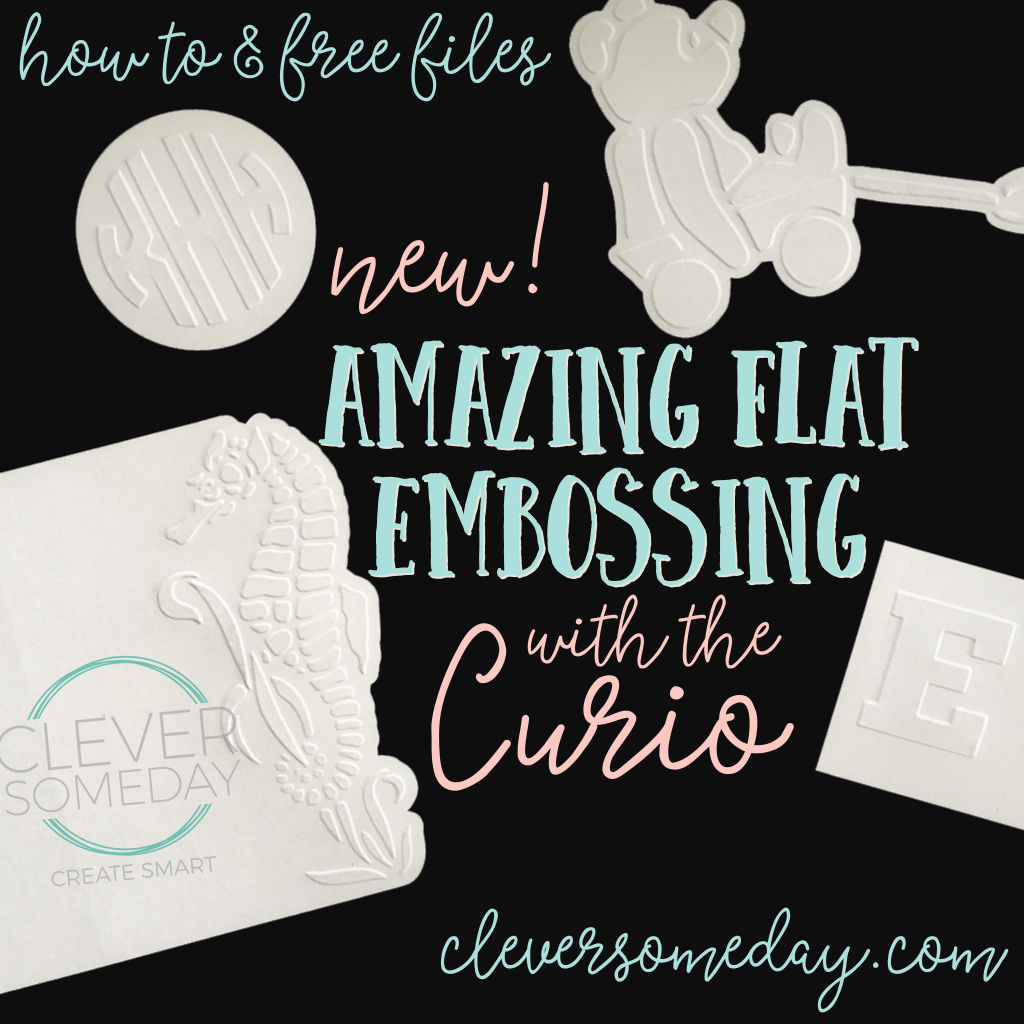

So excited for the big reveal of my new technique for embossing with the Curio. You aren’t going to believe how well it works and how great your projects will look. If you ever “dry embossed” with a brass stencil, a stylus and a light table, then you’ll understand what is involved here. We’re going to put a stencil under our paper and let the Curio do the embossing for us.
2 things are key to this … the perfect path, in the perfect spot. Creating the path is pretty simple in Silhouette Studio using the Offset feature. Landing that path exactly on top of the stencil is a little trickier, but the Curio is really perfect for this, because of its base and platform system.
I’ve made a detailed video for you,
but I’ll rough out the process here, too, and include all the settings and other resources for handy reference.
What you need:
-A Silhouette Curio machine (great prices lately)
–Curio fine embossing tip (comes with the machine in most cases)
-1/4 inch and 3/16 inch hole punches or a Cameo machine (punch recommendations and Cameo file here)
-stencil media … I recommend plastic poster paper from Michaels or Silhouette Chipboard
-media to emboss … I recommend Neenah 67 lb Exact Vellum Bristol
-intermediate or advanced Silhouette Studio and Curio skills. This is not a difficult process, but it does require you to have mastered all the fundamentals.
Prepare the file
Tip: If you want to skip this part for now, I’m sharing the file from the video so you can practice with that.
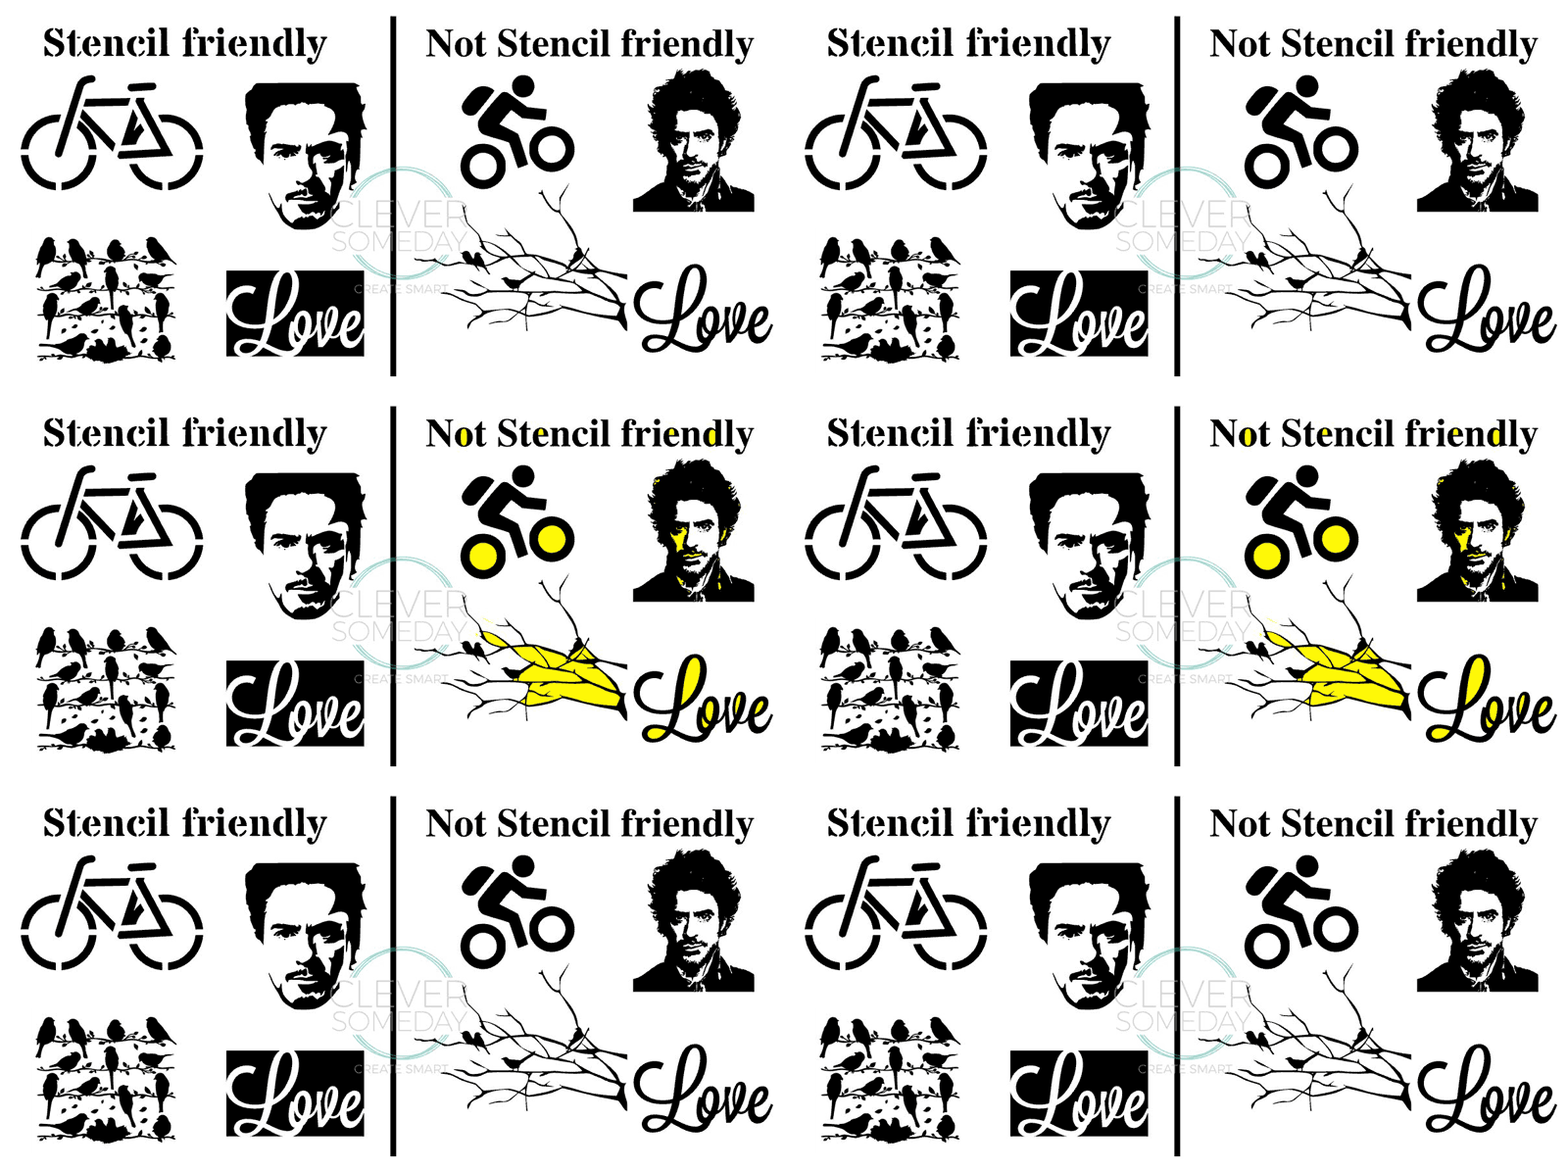
-Choose a stencil image. Because we want a one piece reusable stencil, there can’t be any trapped white space. I made a little visual to help you with this.
The dingbat fonts I show in the video and use on the project are here:
In many cases, you can create your own stencil friendly designs from an existing font or image. Terrific tutorial by the fabulous Nadine Muir here.
-Bring your stencil image into Silhouette Studio and trace if necessary.
-Lay out your design as you would like it to appear on the embossed page. Important: Size to final dimensions.
-Set the stencil cut line to red if its not already.
-Apply an inner offset of .020 inches (critical for success) to your stencil and set the line color to blue.
-Add a cut line if desired (I use a green line for this). Video on how I created the cut line for the card is here.
-Mirror the design with respect to the page. My quick method below:
-Draw a dummy shape (like a rectangle) wider than the page.
-Select the dummy shape and Object>Align>Center to Page.
-Select the dummy shape and everything on the page and Object>Mirror>Flip Horizontally.
-Delete the dummy shape.
-Save the file. (Lock the layers if you have Designer Edition.) It’s very important that you don’t make any changes to the file after the stencil is cut.
Prepare the media
-Cut the stencil media and the media you will be embossing to 10-1/16 inches x 7-5/16 inches
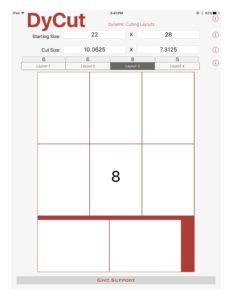
Tip: I use a free iOS/Android app called DyCut instead of doing the math. Here’s what it told me is the most efficient cut layout for the poster board.
-Punch the pilot holes in their proper size/locations. The whole process rests on a good fit so do this part carefully. Full tutorial on how to do this, recommended tools and a free cut file if you want to use your Cameo for the punching instead.
How the trimmed and punched media for the stencil and for the embossing look
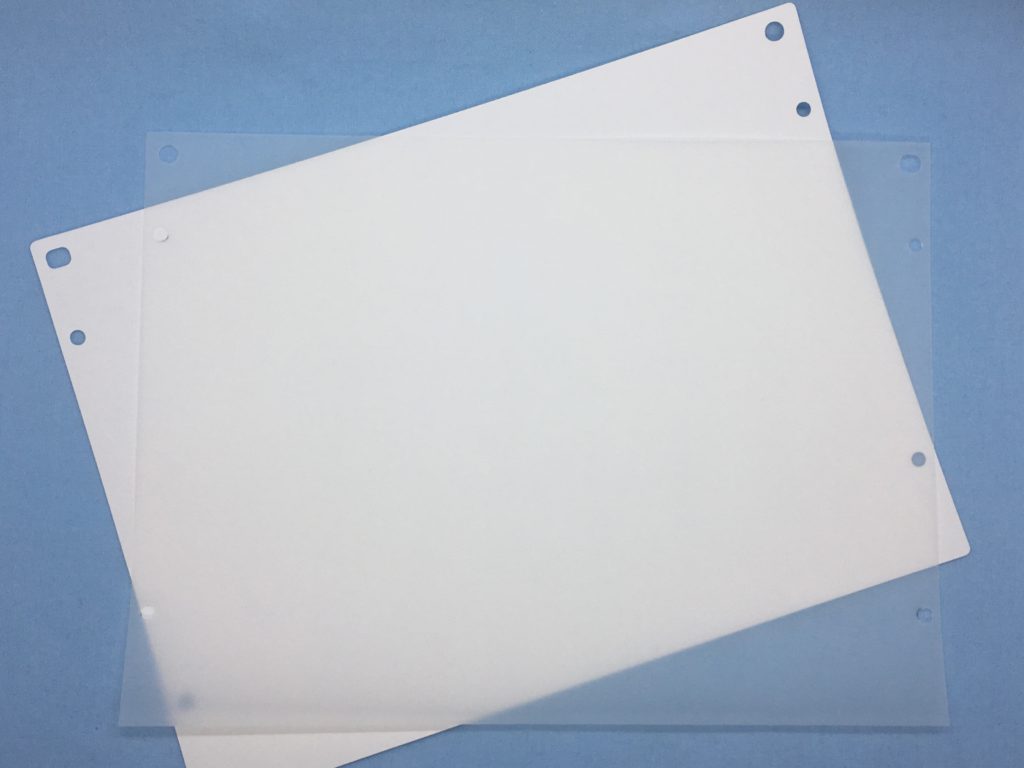
Cut the stencil
-Load your Curio base with the following stack for the stencil cutting step

-Under Cut Settings>Advanced>Cut by Line Color, uncheck all but the red and make sure that the corresponding red tool circle is on for the red row. Verify that only your stencil cut line is highlighted in the Cut Preview.
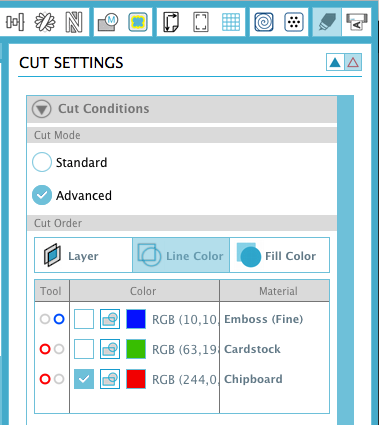
-Select appropriate settings for the red row based on test cuts of your media with your Curio.
Here are the settings I use for plastic poster board with the above stack
blade: 4 in red (left hand) holder
platform: 5
speed: 3
thickness: 30
double cut on
overcut at .2mm, .2mm
Here are the settings I use for Silhouette Chipboard with the above stack
blade: 3 in red (left hand) holder
platform: 5
speed: 4
thickness: 20
double cut on
overcut at .2mm, .2mm
-Verify that the blade, at the proper setting, is fully seated and locked in the red (left hand) holder.
-Send to Silhouette
-Remove the mat and stencil, weed the stencil and clean any extra pieces from the mat.
How the final stencil looks
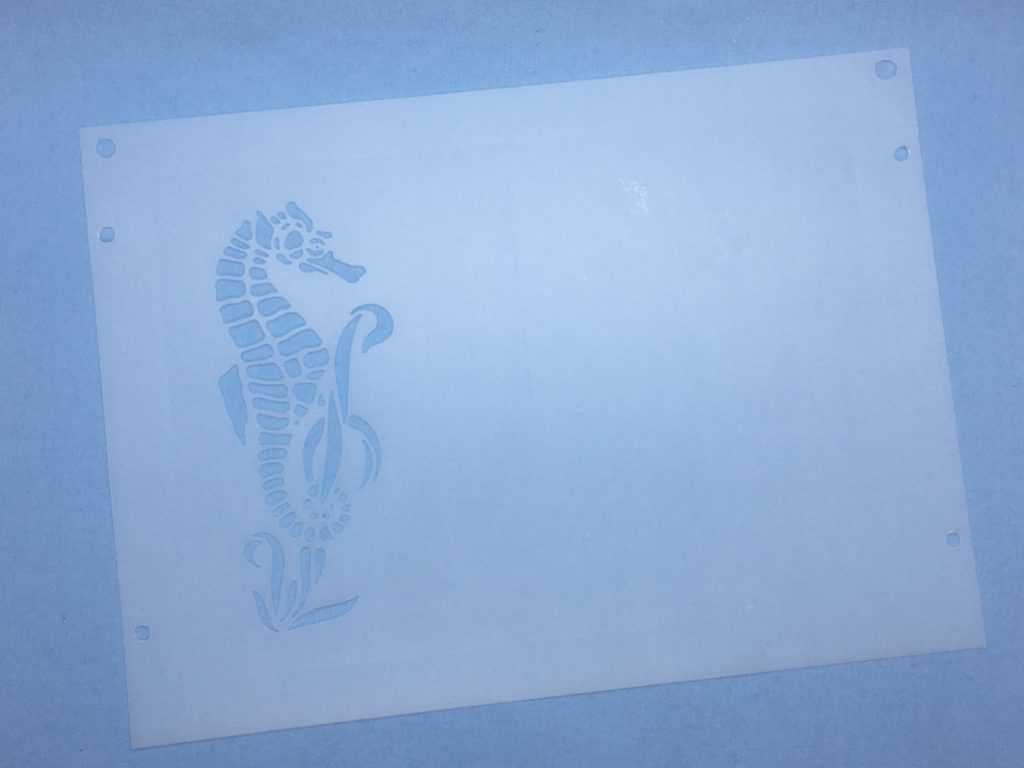
Note that these stencil-making steps only have to be done once for each design, and that the stencil is reusable for as long as you have the corresponding cut file.
-Write the filename on the stencil for easy reference.
Tip: You can use the empty space on a stencil for more designs, so there can be more than one file per stencil.
Emboss the design
-Load your Curio base with the following stack for the embossing step

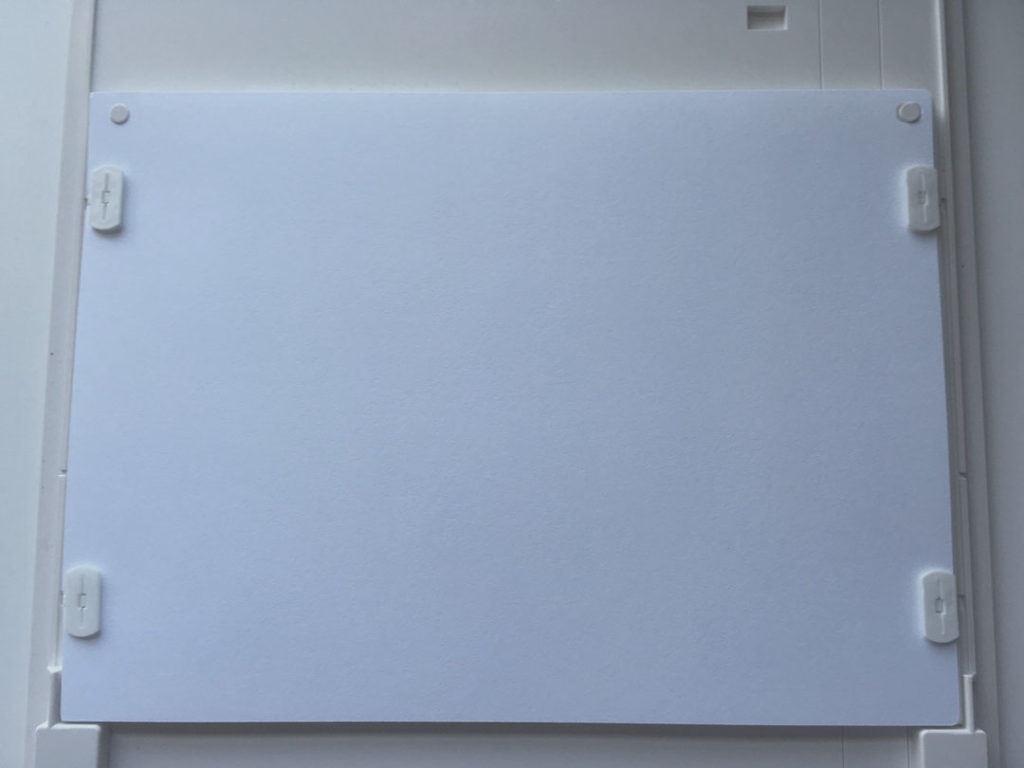
How the stack looks after loading the stencil back on.

How the stack looks after loading the embossing media, ready to load into Curio.
-Under Cut Settings>Advanced>Cut by Line Color, uncheck the red, check the blue and and make sure that the corresponding blue tool circle is on for the blue row. Verify that only your embossing line is highlighted in the Cut Preview.
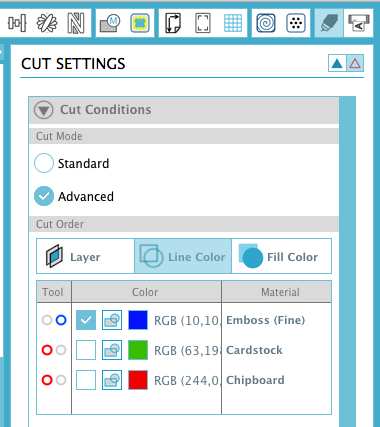
-Select appropriate settings for the blue row based on test embossing of your embossing media with your stencil media on your Curio.
Here are the settings I use to emboss Neenah 67 lb Exact Vellum Bristol with the stack above and plastic poster board or Silhouette Chipboard for the stencils
tool: fine embossing tool (clear plastic housing) in the blue (right hand) holder
platform: 5
speed: 5
thickness: 33
double cut on
-Verify that the fine embossing tip is fully seated and locked in the blue (right hand) holder.
-Send to Silhouette
How the completed embossing (actually debossing at this point) looks
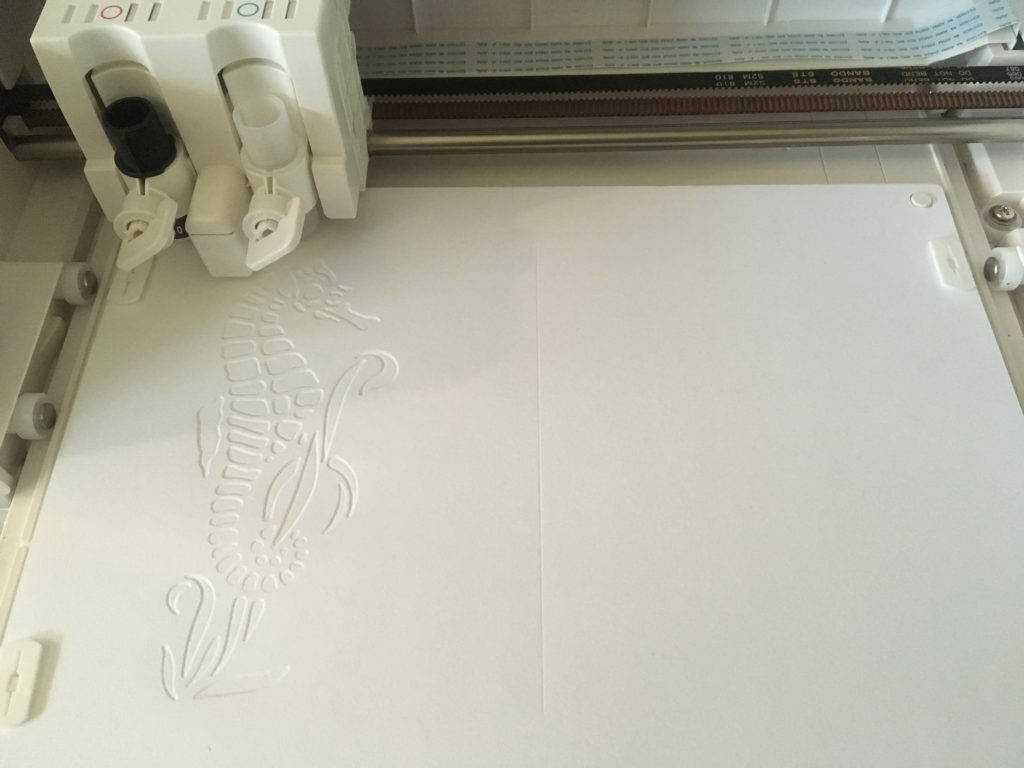
-Remove the embossed sheet and the stencil. Put the stencil in a safe place.
How the embossing looks like when flipped over. (It’s OK to peek, but be sure to turn it back face down for the last pass.)
Cut the design
Tip: you do not have to cut around the design with the Curio, though it is very convenient and accurate to do so. You could use paper trimmers, punches, thin dies, or your Cameo with PixScan instead.
-Load your Curio base with the following stack to cut around your embossed design

-Under Cut Settings>Advanced>Cut by Line Color, uncheck all but the green, check the green, and make sure that the corresponding red tool circle is on for the green row. Verify that only your cut line is highlighted in the Cut Preview.
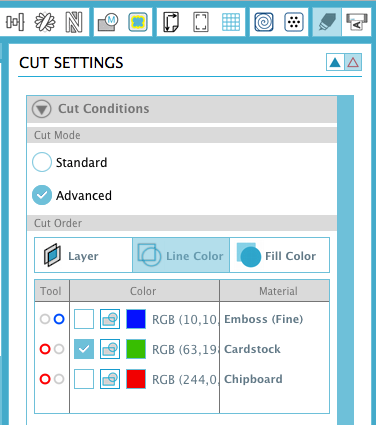
-Select appropriate settings for the green row based on test cuts of your media with your Curio.
Here are the settings I use to cut Neenah 67 lb Exact Vellum Bristol
blade: 2 in the red (left hand) holder (do not forget to physically adjust the blade!)
platform: 5
speed: 4
pressure: 20
double cut
overcut at .1mm, .1mm
-Verify that the blade, at the proper setting, is fully seated and locked in the red (left hand) holder.
-Send to Silhouette
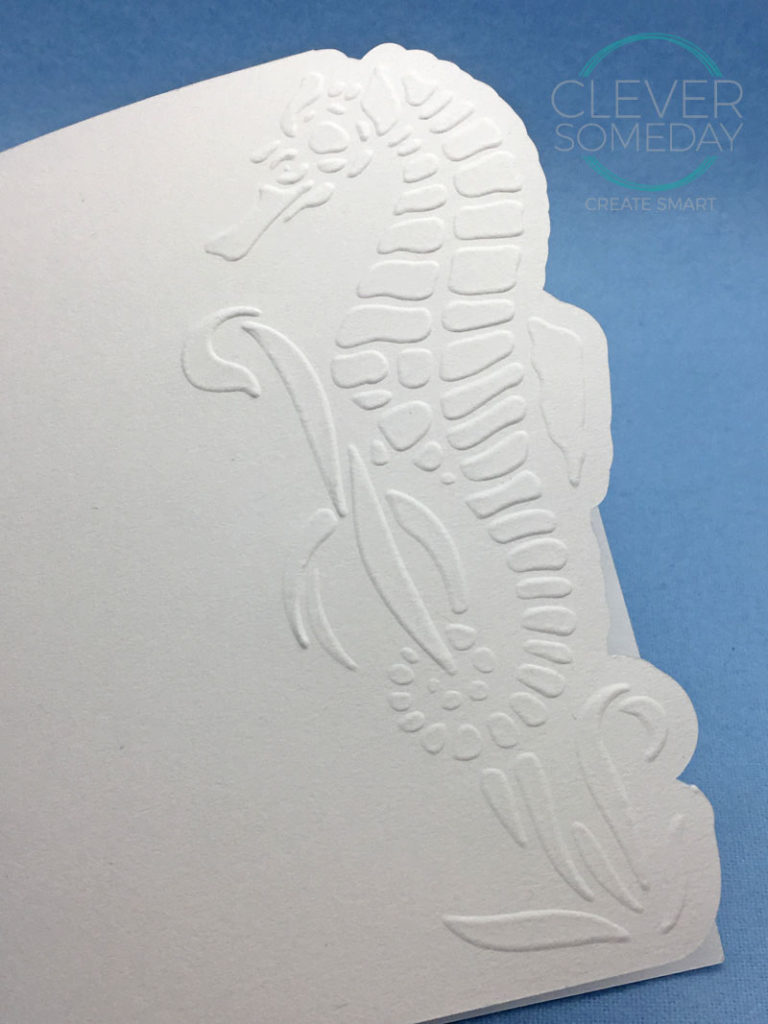
-Unload the mat, admire your work, embellish as desired, or use as an embellishment.
Download the seahorse card file here.
If you like this technique, please share it with your friends who have, or are thinking of getting a Curio! Pins, tweets, likes and comments are always appreciated.

This is gorgeous, Kay! This makes me want a Curio!
Kay, I wish you were my neighbor! This is so incredibly awesome and so “me” but you lost me a few times. Had no interest in the Curio until now. May have to put my big girl pants on and bite the bullet! You are so clever everyday and I am always amazed at the way you take everything to the next level and beyond! The more I know the less I know. Damn!
Thank you for sharing this great technique. Your video is great! And here I was thinking in investing in a die cutter for embossing and you just solved that issue with this! Awesome!!!
Thanks for the link Kay 🙂 If anyone wants to go ahead and load their modified font into a new installable font, I have a short video showing how I did that. I used a free web based software called Glyphr studio. https://youtu.be/X3xUytox66M
Thank you. Videos are SO helpful when a technique is new.
kay,as usual a brilliant idea for us to try,makes me want to use my curio more,loving the effect.
Thank you
Fabulous technique Kay and wonderful tutorial.
GENIUS!! I can’t wait to try this, Kay!
Fantastic turorial. Thank you!
You never cease to amaze me. You have an incredible talent and make complex steps easy to follow. Thank you for taking the time to share your genius.
Thanks so much Kay…. brilliant technique and I’m going to try this out now
So I had a go thinking will it really be that different than using the embossing mat? And yes the difference is amazing!!
I did a side by side comparison of the embossing results using the embossing mat ( the official way) and the results using your technique and I am completely hooked even though it’s a bit more work.
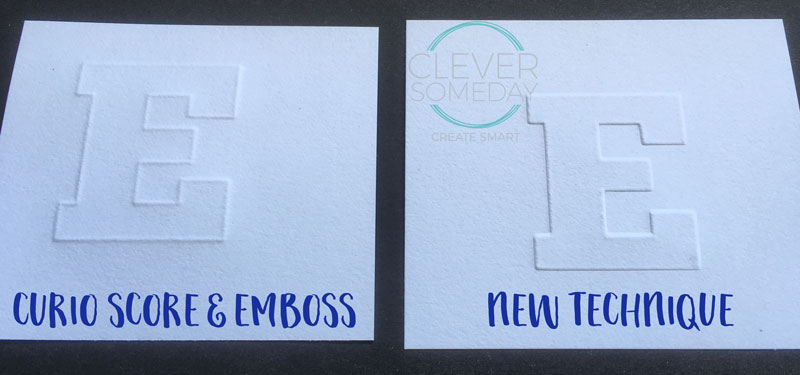
Thanks for your comment, Kim! The first picture in the video (the one with the E’s) is my side by side comparison of the normal curio score & emboss vs this stencil method. It really is a striking difference, and that’s how I knew I was on to something. But I’m glad you tried it for yourself, because you really can’t be sure from someone else’s photos.
Kay,
Thank you for your wonderful tutorial. I was afraid of cutting paper until I saw it done with the Curio today! =)
Could your seahorse be used with the Curio on acrylic blanks for etching as it is? Or would it need modified?
Thank you again for all you do.
Jerri, if you were going to etch the seahorse into acrylic, you would want to add an embossing fill as I do in the clipboard project elsewhere on the blog. If you don’t, you will just get an outline, which is usually not the look people are after with etching. It also doesn’t show up very well without the fills.
Sorry for the late answer, Jerri. This one slipped by me. You could use the seahorse for etching, but you would want to add an embossing fill because the thin outlines just don’t show up very well.
No worries Kay. I believe you were at the ATSC in your new ultra snazzy pants when I posted this! Thank you for your response. Jerri
Amazing!
Congratulations my dear! Your emboss project is the best!
Thank´s, your teaching is incomparable.
Kay when clicking on video about making cut line for card,it says in not available
Thanks for catching this Susannah. I have corrected the link so please refresh the page and try again.
Hi Kay
Thank you so,so much for this. I’ve just bought a Curio and had it in my mind that there must be a way to do this but hadn’t yet figured it out. Ive also got a Brother Scan and Cut which has an Embossing kit that achieves the same outcome but requires the stencil to be cut twice (long process but it does work), though the item would have had to be rescanned before cutting. I’ve already made some new mats for the Curio with your method and i’m working on the Embossing today.Because of how the mat stack works I wonder if it would be possible to make a Chipboard embossing mat that has a raised rather than cut out image, so that non stencil images could be used, I’ve seen similar made and used for the manual embossing machines. Perhaps cut the pieces from one piece of chipboard,then draw the image on a chipboard mat, stick the pieces on and create a file with an outer offset rather than an internal offset. I could see that the chipboard pieces would need to be less thick than the depth of the tip of the embossing tool. What do you think? Comparing the two companies, Silhouette and Brother, both have their good/not so good points but on the whole id say Silhouette definitely has the better software, the Curio stands on its own in the market and is a fantastic sidekick to any Plotter/cutter and the Brother Scan n Cut seems to have more downforce to cope with denser materials. No matter what, we love our machines and your tutorials are 5 Star!
Just had a thought, the gap between the pieces would need to be big enough to accommodate the embossing tip wouldn’t it, would need to be taken into account and checked when adding the offset, not so easy this coming up with new processes is it!
LOL, well, yes its not that easy coming up with new processes, but you have to start somewhere, find the roadblocks and work around them. Love your brainstorming, though!
Thanks for your comments, Beverley. I like how you are thinking. There are several methods to use a non-stencil image, but I wanted to keep things as simple as possible to start with since the process itself it a little complex. I’ll probably do a tutorial on that when I’ve had a chance to settle on the best method and tweak the settings, etc.
Am new to some of silhoutte,but am going to try this,never heard of overcut what does it mean,please
Please note that this is not a beginner level project. You might be better served to get some experience and come back to this. Overcut tells the machine to run a little past, and pick up the blade at corners for a cleaner cut. Like the difference between a baseball player running past first base vs rounding second.
Just a quick follow up, instead of using your ready prepped file I followed your excellent instructions to learn the process from start to finish to create my own file before going on to cut, emboss and cut again. And I can’t tell you how stoked I am with the outcome, I’ve already created a second file that is a wall of bricks. I love making up the 3D card buildings svgs that are available but they quite often use embossing folders I just don’t have. No longer! I’m going to create embossing files that go with the elements of the Building, eg Doors, walls, roofs etc.
and this was supposed to be a quick follow up!
Thanks Kay, from a grateful Kiwi!
Thank you so much for the report. It makes me so happy when people take what I put out there and run with it. Thanks for taking the time to let me know.
Brilliant, Kay! I’m so impressed (pardon the pun)! Thank you for sharing the details and making a very good video. Can’t wait to test this out on the various KNK cutters and write up tutorials. I’ll definitely cite you as the original developer of this technique.
You are an absolute GENIUS! I had a lot of trial an error this morning working with your technique and example file, but the concept of cutting on the cameo to fit the curio and then creating a stencil yielded INCREDIBLE results! I have to say I was a little disappointed in the curio embossing UNTIL NOW!!! THANK YOU SO MUCH FOR POSTING THIS!!
Can you emboss with a Cameo?
You can emboss with a Cameo using and embossing tool and soft mat but the results are disappointing on anything but vellum or thin metal. I have not been able to get this new embossing technique to work on the Cameo.
Kay,
What was the issue(s) with doing this type of embossing on the Cameo? Was it the registration/lining things up or something else? Thanks!
Not enough pressure 🙁
Hi, Kay! I don’t understand why that is, because the Cameo and Curio have exactly the same cutting force (210 grams). I’m not saying I disbelieve you, I’m just wondering what is up with this crazy Cameo. I’ve never tried embossing on it. I might try and see what happens. I’m going to be getting a Cricut Maker soon… that seems to be the machine to have these days. My Cameo has been good to me, though, and I love to experiment. 😀 Thank you for your reply, Kay! 🙂
I too was surprised (and disappointed) that I could not get the same result with the Cameo. Yes, they do both have the same engine with 210gf, but there is something about the way the platforms and/or additional dwell length of the Curio leverages the pressure that makes it more effective for certain operations. There is variation among machines as well, but I tried both my Cameos with similar (lackluster) results. I would love for you to try it and see what your results are. You will want to use the print and cut jig method I developed for precise placement. (It the same one I used on the Cricut embossing technique, but it much easier on the Cameo.) And also multiple passes will help.
I’m also planning to get a Cricut Maker, but not until the knife blade ships.
Thanks so much Kay. I am looking at getting a Curio – the prices are great now and I wanted to see how easy it was to emboss (the main reason I am looking into it). There are a lot of steps here but I may take the plunge.
You are helpful as always.
Thanks!
Thank you for such a great detailed video and information. I will try to get the poster board from Michael’s. I wonder about the vellum paper.I have seen a lot of them advertised but are in a yellow package. Do you know if they have changed the packaging since you showed the video? I think there was a change in ownership, not sure but maybe, or is the one in the yellow packaging different paper? I am trying to find it in other places.
The packaging I showed is the retail cellophane packaging. The yellow paper wrappers are the office supply style packaging but its the same stuff. This works with pretty much any mid weight card stock.
Thank you. Sorry for delay. A lot has been going on, have not been creative & just got back on the site & want to try to start some projects again. I have missed my Curio & Silhouette. 🙂
I am SOOO grateful you put this together, I’ve been trying to figure out how to use my Curio instead of my big shot. I have had NO luck finding the plastic poster board at Michaels, but I have tons of stencil vinyl, would that work? Also, you’re using the vellum, but I’m a bit confused on how your end result looks like cardstock, and I’ve watched your video 4 times now, what am I missing?
The plastic poster board is in the rack with the other poster board at Michaels and is easy to miss because it blends in. Stencil vinyl will not work, but any similar thickness cardstock, chipboard or plastic you can cut will work.
“Vellum” is a term for the finish of the paper in this case. I wish I had thought to point out that this is not to be confused with “translucent vellum” which is what most crafters think of when the hear “vellum”. This technique would not be necessary for translucent vellum as it embosses nicely with the standard embossing (soft mat) method.
Thank you for this video. I’m comfortable on the Sillouette but just got my curio and I’m excited to try new things… This gives me inspiration!
Thanks again for this excellent tutorial, Kay. I can imagine the time and care you have taken to figure this all out. And then you were kind enough to help me out with Inkscape questions; even converting the seahorse to svg for me. You are an intelligent and generous woman!