• About
    • Contact Me
  • Fonts
  • Sketch/Foil
  • Silhouette
    • Where to find free .studio files
    • File Formats Chart
    • Distress Kit
    • How to Back Up your Library
    • “Chevronizer”
  • Cricut
    • Command cheat sheet
    • Cricut Engraving Resources
    • Online SVG tools for Cricut users
    • Images to Design Space
    • Curve calculator
    • Cricut Print and Cut Methods
  • Resources
    • Vinyl Cost Calc
  • Curio E-Book
  • Maker E-Book
    • Bloglovin
    • Facebook
    • Pinterest
    • Twitter
    • YouTube

Clever Someday

create smart

Better image sizing in Cricut Design Space 3

May 27, 2017 by Kay

Update: DS now used 72 dpi for size reference. This is unfortunately not an appropriate dpi for print, so should only be used for true size applications.

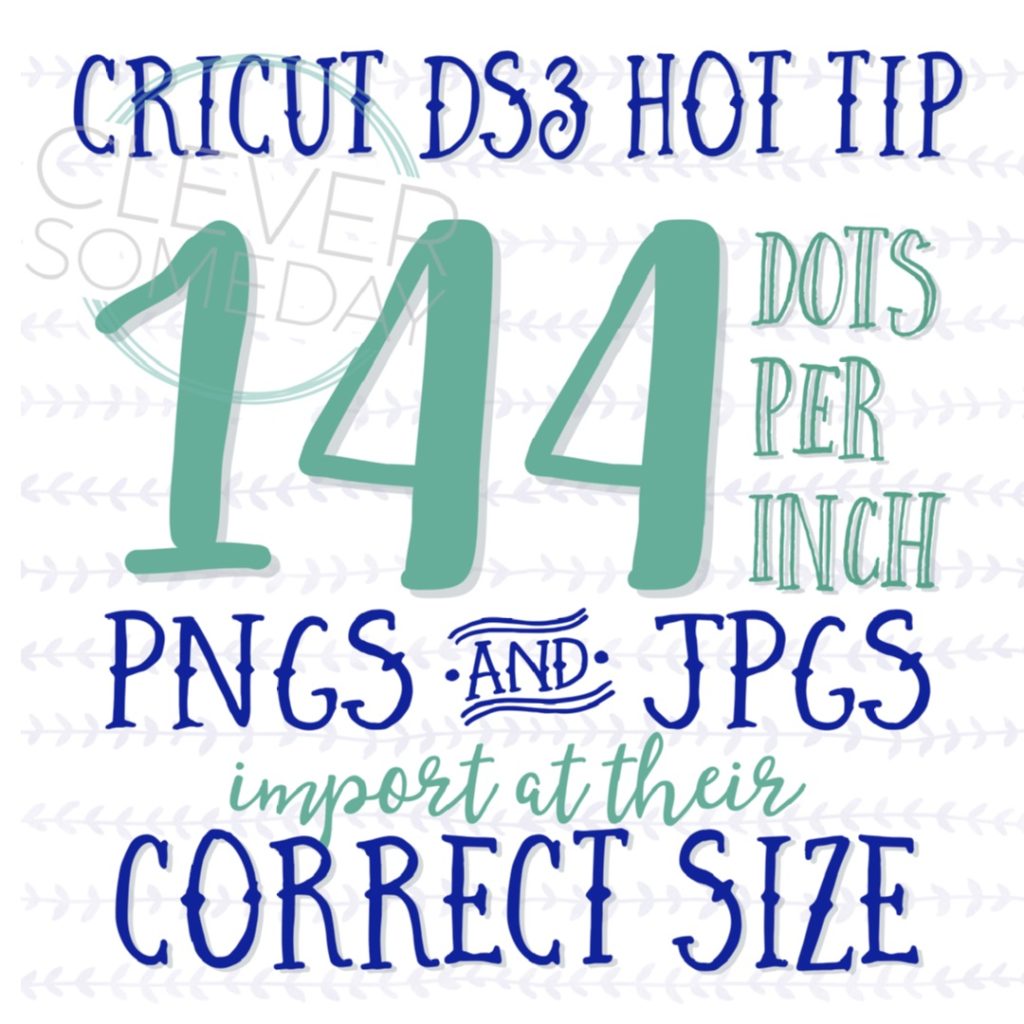
You may recall that in DS2, all bitmap images imported at 2.4 inches high, regardless of their original pixel count or resolution. This meant unless your images started at 2.4 inches they were always incorrectly sized, both absolutely and relatively. An unannounced feature of DS3 is that images set to 144 dpi resolution will import at correct size. So, for instance, if you scan a stamped image with your scanner set to 144 dpi (unfortunately this is not a standard setting so not always a direct option), then when you import the scan to DS3, it will stay the actual size of the original stamped image.

This also means that a set of images of the same resolution will import at the correct relative size now. 144 dpi should work fine to make a cut only file, but it’s too low for print images. So my advice if you are scanning an image for print then cut is to save at 288 and then scale the image to 50% (divide one dimension by 2 with the proportion lock on) after you import.

If your scanner does not let you specify 144 (or 288) as an option, scan at 300 dpi and use an online DPI converter to change it to 144. Or if using Preview, Photoshop, etc, change the DPI *without* resampling.

Update: also see this video for a simple sizing method using a reference shape.

SaveSave

(Visited 9,012 times, 1 visits today)
Amazing flat embossing with a Curio
About the leggings

Comments

  1. Sandy Stark says

    May 27, 2017 at 10:17 pm

    Thanks for sharing this find, Kay! It is very helpful information.

  2. Marie Fix says

    May 27, 2017 at 10:33 pm

    Thanks Kay! This is wonderful news for us stampers. I am going to have to check out what dpi my scanner would do. I am wondering how that would effect the smoothness of the cut shape but will have to try it out. Your tips are always so helpful!

    • Kay says

      May 27, 2017 at 11:25 pm

      I think 144 will yield a smooth shape. If not you could double the resolution, then half the size after import.

  3. Phyllis says

    May 27, 2017 at 10:47 pm

    Thank you for sharing this great info!

  4. Vesta says

    July 8, 2017 at 6:52 pm

    Hi Kay, thanks for your tips. I saw that I can stamp a stamp and take a picture then upload it to DS3. Do I have to convert it to an Svg first? Do I have to set it to a certain dpi? Thanks in advance.

    • Kay says

      July 8, 2017 at 10:15 pm

      Hi Vesta,
      As the post explains, when you scan an image and save it at 144 dpi, it will come in at the correct size. This applies to the scan as saved in jpg or png format. It is not necessary to convert it to SVG and if you do, it will probably not be the correct size. If you take a photo, instead of scanning, there is no good way to maintain the size. I have a post here on an easy way to make stamp outlines https://cleversomeday.com/stampoutlines24/

  5. Cheryl Fredrickson says

    July 17, 2017 at 12:12 am

    How do I download the arrow crafter font? I am trying to download it on my pc but I can’t figure out how to download them separatly so I can build my own arrow.

    Thanks
    Cheryl

    • Kay says

      July 18, 2017 at 2:09 pm

      Hi Cheryl,
      Arrow Crafter is downloaded like any other font. A text file with instructions on how to use it is included in the download folder.

Trackbacks

  1. Easy stamp outlines in Cricut Design Space says:
    September 4, 2017 at 11:51 pm

    […] Design Space always brings bitmaps and Cricut shapes in at 2.4 inches high. [Update: please see this post for important sizing information in Design Space 3]. We’re going to exploit that fact with this […]

  2. Easy stamp cutlines in Cricut Design Space 3 says:
    October 13, 2017 at 10:48 pm

    […] a “scan and cut” feature, nor does it bring in scans at actual size (unless they are 144 dpi, which most scanners don’t support), so I’ve been constantly looking for tricks I could […]

Subscribe by Email

Enter your email address to subscribe to Clever Someday and receive notifications of new posts by email.

Join 8,569 other subscribers

Just so you know…

I may be an affiliate for some of the products I recommend. This means that if you purchase one of those items through my link I will earn a commission, even though the cost to you will not be higher. Using these links is an easy way you can help me defray the costs of keeping the blog running. I hope I've proven to you over the past 9 years that I am going to tell you the truth, regardless of any financial interest I may have.

I recommend …

  • LDThin150.jpg
  • dealjumbo150.jpg
  • Samantha150.jpg
  • CQbundle150.jpg
  • SCAL4150.jpg
  • stswirly.jpg
  • BPBigbundle.jpg
  • beautifulbundle.jpg
  • bundle-of-glory-sq.jpg
  • Seniors-bundle.jpg

Most Popular Posts

  • Flat embossing with a Cricut Explore or Maker
  • Tumbler template freebie
  • Cricut Engraving Resource Page
  • Yeti tumbler template freebie
  • Fonts

Shop Amazon

Archives

Categories

75 Follow
Our Disclaimer

© 2023 · contents by Kay Hall. Pretty Creative WordPress Theme by Pretty Darn Cute Design