Can you explain what it is?
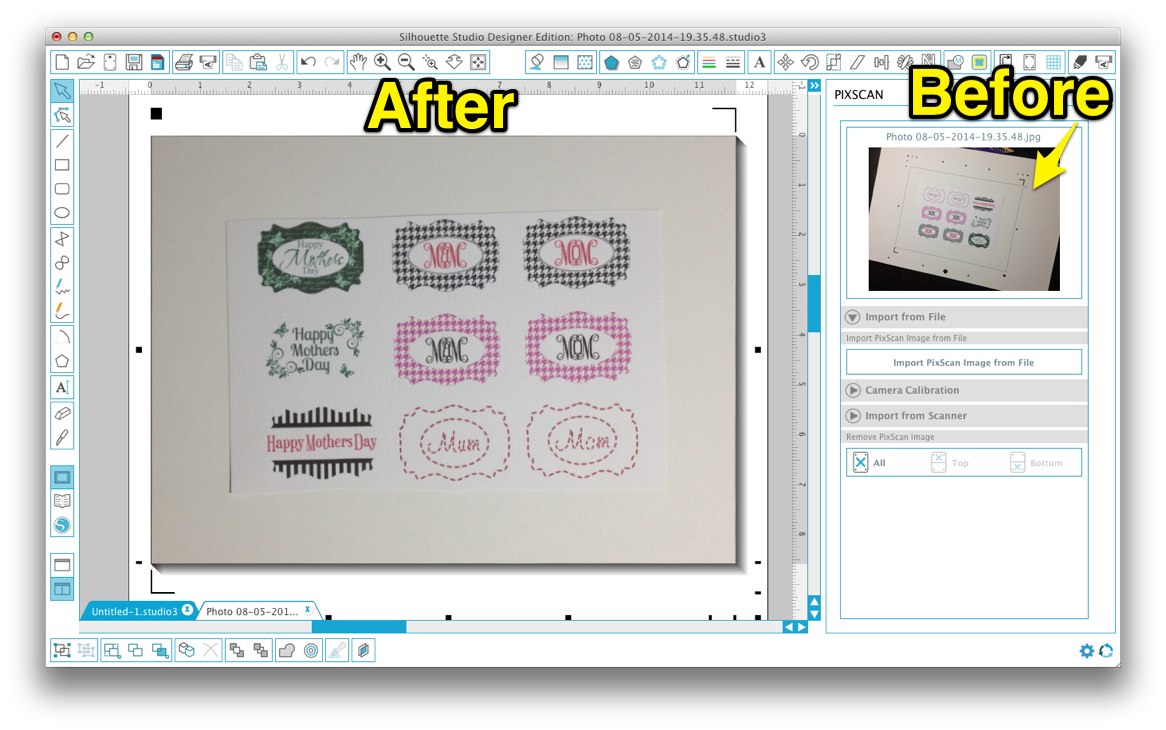
PixScan takes a photo or scanned image of a physical mat and places it on the virtual mat in exactly the right size, orientation and position. To do this, you need a specially marked PixScan mat and a software module that is built into Silhouette Studio v3.1 and higher. You put your image or item on the physical PixScan mat, snap a photo or scan it, and, once imported into Silhouette Studio, the PixScan technology resizes it, corrects for angles (camera) or stitches it together (scan). From there you can trace or otherwise place cut lines for precise cutting, drawing or designing. The example shown below uses a simulated mat since I do not have one yet. Pretty impressive.
What is it good for?
PixScan is for cutting out preprinted images that can’t be printed from Silhouette Studio with registration marks for standard Print and Cut. In other words, PixScan is for when you can’t print the marks on the same page you want to cut out of. Examples would be cutting out images from wrapping paper, greeting cards, decoupage sheets, or cutting out images you have stamped and even embossed.
You can also use it to cut from precut sheets, so, for instance, adding borders to or cutting out shaped windows from precut cards. You can also use it to position cuts with respect to the particular pattern on a page, or to cut from oddly shaped scraps. If you need to hit a small target with precision … like when engraving on a small blank or writing on a small tag … PixScan is ideal.
As you probably already know, certain media don’t lend themselves to printing and/or reading registration marks on. Black paper, for instance, or transparency film or foil or any of the media that Silhouette machines have trouble reading the marks from can be put on a PixScan mat instead. Potentially big benefit here.
We can even combine standard print and cut with PixScan cuts. For instance, print and cut a page of shaped tags or bookmarks, laminate them, then use PixScan to cut around them with a margin so that the laminated edges stay sealed.
Another application would be for designing things at true size, when the original might not be convenient to scan. If you have a gasket to replace, for instance, use PixScan to help you design a new one for an exact fit. Similarly, you could design a cut file to perfectly match an acrylic keychain shape.
Many high end users have issues with the print colors out of Silhouette Studio and prefer to print from Photoshop, etc. That is another good use for PixScan.
Finally, PixScan gives you a way to print and cut a full 8-1/2 x 11 page (Cameo only) instead of having to leave room for registration marks as you do now.
Do I have to update to V3?
Yes, you have to update to V3.1.417 or higher to use the PixScan technology. You can get the update here.
Do I need separate PixScan software?
No, PixScan is built into Silhouette Studio V3.1.417 and higher.
Which machines will this work with?
The Silhouette Cameo and the Silhouette Portrait. The Cameo will only work with the PixScan Cameo mat and the Portrait will only work with the PixScan Portrait mat.
How much does PixScan cost?
The software update is free. All you need to buy is a PixScan mat, which retails for $14.99USD, the same prices as a standard Cameo mat. You will not want to use PixScan mats exclusively though, because the cutting area is smaller than a standard mat.
Do I need Designer Edition?
No.
Do I have to have a smartphone?
No, all you need is a camera or a scanner.
Do I need a special app?
No, the PixScan technology does the photo processing.
Do I have to have a scanner?
No, you can use a camera.
What if my scanner doesn’t work with Silhouette Studio?
You can use any camera.
How do I get my photos from the camera/phone to the computer?
That will depend on your camera/phone or computer. Check online help sources for the most convenient methods for you.
How is this different from just scanning?
When you scan, assuming you save as jpg, you have the image at the right size; but with PixScan you also have it at the right position and orientation on your virtual mat for cutting.
How is this different from Print and Cut?
With Print and Cut, you start by printing your design, along with registration marks, on a blank, uncut sheet of paper. With PixScan, the material you will be cutting is already printed and/or your page is already cut. Both processes rely on having the cutlines in the same relative position to the registration marks on the physical mat as they are on the virtual mat. In Print and Cut this is accomplished simply by printing the marks on the page from within the software. With PixScan, the marks are fixed on the mat itself, and the software interprets the photo or scan you input to determine the correct relative position of the cut lines.
Is this better than Print and Cut?
This is not better or worse than Print and Cut, it simply extends Print and Cut to cover new uses that aren’t practical now.
Can I use this instead of the old Print and Cut?
You can, but there won’t usually be an advantage in doing that, and there may be some disadvantages. For instance, in standard Print and Cut, you may already have a cut line, whereas with PixScan you have to create one. (You can combine the two methods, of course, but that adds to the complexity).
Do I still have to trace?
Yes, you still have to trace to get the cutlines. If you need to brush up on tracing, make sure and check out my Tracing without Tears video series.
This video specifically about tracing stamped images may also be helpful
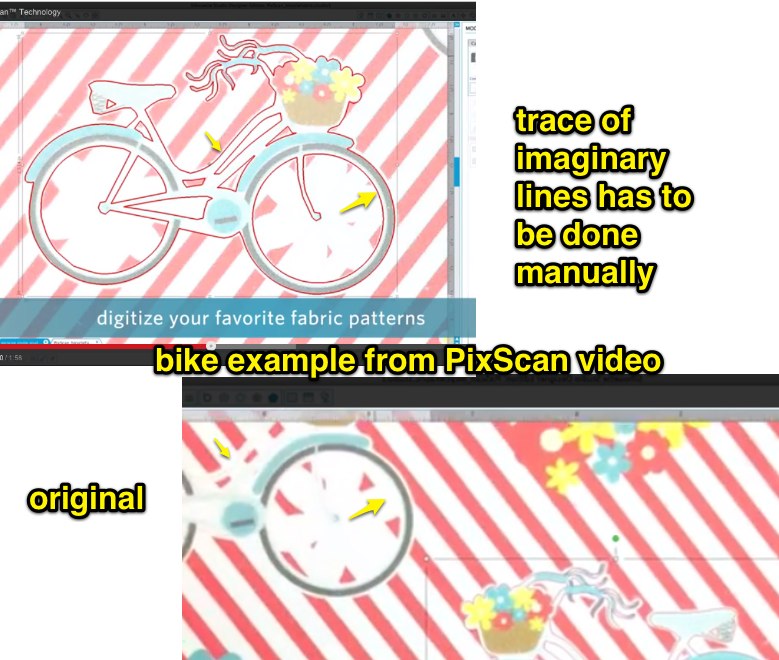
How did they get the cut line for the bicycle in the promo video?
In my opinion, that cut line was manually drawn. There is no line in the original to trace and no software that I know of can trace an imaginary line.
Can I use it with an SD?
Sorry, no, the SD uses different registration marks and there is no mat or programming to support it.
Do I have to calibrate my camera/phone?
If you are not using one of the smartphones/tablets that has calibration data already built in (see list below) to Silhouette Studio you will need to do a one time calibration of your camera. It involves printing a test page, photographing it and importing it into Silhouette Studio. Complete instructions can be found on page 35 of the manual (find the manual under the Help menu in Silhouette Studio). I recommend you visit this blog post from Debbie where she shows you exactly what a successful calibration photo looks like.
What smartphones/tablets are supported without calibration?
- Kindle Fire HDX
- Apple iPad mini
- Apple iPhone 4s
- Apple iPhone 5c
- Apple iPhone 5s
- HTC Desire 300
- HTC EVOV 4G
- Nokia Lumia 520
- Panasonic DMC-TZ55
- Samsung GT-P3113
- Samsung SM-T230
- Samsung SPH-L720
- Samsung WB250F, WB251F, WB252F
- Sony C6603
- update: additional cameras/phones have been added with updates so do not calibrate unless you are prompted by the software to do so.
I can’t update, are there alternatives?
Yes, for cutting and stamping here, for cutting from scraps here. There are also a number of smartphone/tablet scanner apps such as Genius Scan and Turbo Scan that can correct photos for more accurate tracing.
A good video that shows the PixScan process
Update: More Info on Pixscan

Thanks for the accurate info! You are absolutely my go to person for all things Silhouette and I truly appreciate your very well done tutorials. I’ve learned a great deal and am greatful!
~Kris~
Excellent. Can’t wait to get my mat.
Could you advise me on the purchase between the Silhouette Cameo and the Portrait. I now have the Cricut Expression. Which one would be equal to,size of mats etc. thanks, Edie
The Cameo is the same size as the Expression.
Very interesting article. Are there any cameras that don’t need calibration for Pix scan? Thank you
I think all those on the list are phones, so no, all cameras have to be calibrated. It’s not a big deal though.
Thank you for all the wonderful information, i updated my silhouette yesterday and waiting for my mat to arrive. Im really excited and cant wait to play.!! Ive watched all your videos and i appeciate all you do.
I understand that I will have to update to version 3. Is it recommended to update to this version yet by pros like you?
The ideal situation is to keep both old and new versions if you can. V3 is not of the quality I would like to see but it is safe and about half of the bugs have been corrected. I am anticipating that PixScan will make it worth the trouble to upgrade, but can’t say for sure until the mats are out and more people have installed. A catch-22 I know.
Can’t i do the same thing. Take a picture, say of some pretty wrapping paper. Load into Studio, then trace my selection, the do the print and cut?
Standard Print and Cut allows you to print your own copy of the wrapping paper and cut a shape from it. PixScan allows you to cut from the actual piece of wrapping paper that you took the picture of. That is the difference.
Thanks so much Kay. i appreciate the info. I am really interested to see how this plays out!
Thank you for that very thorough Q&A. I wasn’t sure if I was interested in this feature, but now I definitely am.
You are seriously brilliant. Truly. Love your thought process and the way you expelling things is amazing. Thank you for all your efforts. Thanks to you I purchased a Silh (Cameo). I friggin love it!!!!! You need to add a PayPal link for readers to help compensate you for your efforts. I’d pay!
Kay – thanks for taking the time to share your findings, opinions and awesome tutorials. I have learned so much. You’re the best! 🙂
Thanks for taking the time to write out all that info Kay, it really helps the newbies to see whether it’s a feature they need or not. The mats should arrive in UK at the end of August, Italy goodness knows when so I’ll be buying through the UK as soon as they arrive. Have already calibrated my phone and worked out how to get my files. It’s another string to our bow as you say – print and cut is print and cut; this allows you to use other media. I’m always for useful new bits! When I think that in 2005 when I bought my first machine we didn’t even have a weld feature and tracing was done by hand .. we’ve come a long way!!!!!
I have a Scan N Cut which has its uses but the Silhouette software is so much better.
You say that I will need V3.1.417 or higher for PixScan to work with my Cameo. I am running release 3.0.531ssde and when I click on “Check for Updates…” I get a message that “No updates are currently available.” Help!!
Check for updates is not a reliable source. This page is http://www.silhouetteamerica.com/software/silhouette-studio
Thanks! I’m now up to date.
I couldn’t find just a general comment place so I did find this one which appears to be really current. I am not sure how I found your blog (I have been on it so long this afternoon I don’t remember where I started from) but I am so impressed and so happy. I had used the Tracing without Tears video before but didn’t know it had all this other information attached to it.
Thank you so much for all the information you are providing to those of us who need it (and we all do at one time or another). I will be visiting here often and I have already subscribed. Keep up the wonderful work you are doing.
Thank you so much for this information and the new video. Good stuff,and thanks for all you share and all your help. You are the best
Your info is far better than the ones provided on silhouette site! I often mention your site where possible to direct people here to get clear information. I noticed that you haven’t listed the iPad 4 (retina display) for example, does it mean I need to do calibration on that? I see the ipad minis listed. Thanks for covering the FAQ so well too, much appreciated!
Please, could you share how to simulate the mate as it’s not available here in Cambodia?
Take a screen capture of the mat in Silh Studio and recreate it. The only way to verify the dimensions would be with a real mat, though.
Hello Kay, How can I contact you, I would like to send you an email.
I dont understand…how does this differ from what u did earlier with placing reg marks on a sheet of paper and doing the lining up?
Also I hope Silhouette gives us the full 12×12 mat for this…i hate the limitation of going down in size
PixScan is for when you can’t print the marks on the same page you want to cut out of. This is a special purpose mat you won’t be using for most things. There probably wont be a 12 x 12 mat because the margins are needed for the special markings.
Thanks, i did some more research and finally figured this out…some mornings are like that. I just wasn’t thinking broad enough.
Hurray! after a half an hour of frustration, I finally got it to work. I am so excited to see what the possibilities are with this.
I have the silhouette designer edition of the software. Will this work with the pixscan?
as long as it is v3.1.417 or higher, yes, DE or basic edition.
Thanks Kay x